You can maximize your integration by creating Informz Target Groups that pull information from iMIS into Informz. Informz Target Groups make it easy to collect information about subscribers in a geographic area (Zip Code Radius) or who participated in meetings and on committees (Activities). Target Groups are also a great way to handle complex reporting and database querying (IQA).
Before creating Target Groups, take some time to thoughtfully plan what information you want to collect, and then design the Target Groups to maximize the potential of the integration.
Create an iMIS Profile Info Target Group
iMIS Profile Information Target Groups can be used to create target groups that provide name and address information about your members. They use fields on the Name, Names_address, and Name_Fin tables (Member_Type, Status, or Country).
To create an iMIS Profile Info Target Group:
- Navigate to Subscribers > Target Groups.
- Click Create.
- Click the Target Group Type dropdown and select iMIS Profile Info.

- Click Create.
- Name the target group and select a folder.
NOTE: There is probably already an iMIS Profile Info folder, but you can store this new target group in any folder.
- Click Next to continue.
- Click the Profile Type dropdown to select the list from which to pull the data.
NOTE: The Profile Type selection will determine whether information is pulled from the Main Profile (Name) table or a specific tab/purpose on the name_address table. The Profile Type dropdown list will always contain the Main Profile table, but will have different entries based on the available tabs/purposes in iMIS.

- Click Next.
- Click the Profile Fields dropdown and select the profile field from which to pull the data.
- Complete the lower part of the window and click Update to finish.
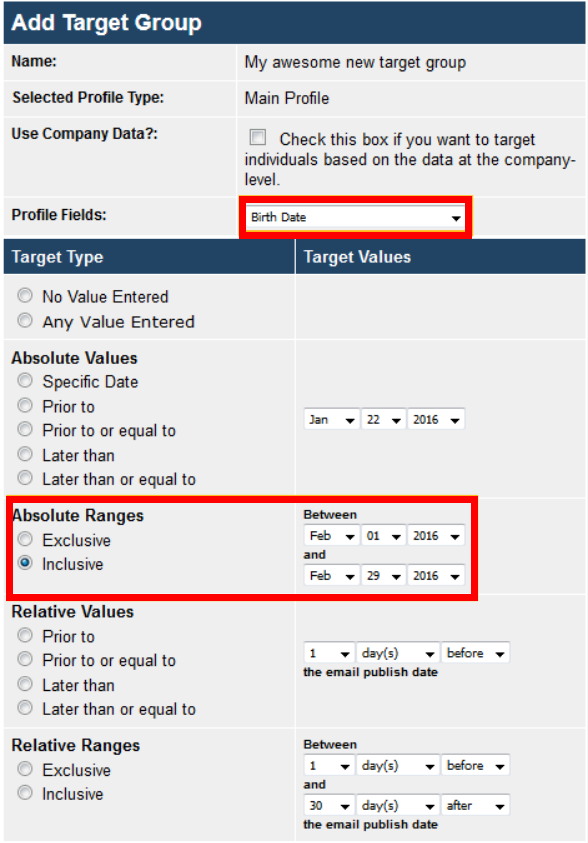
NOTE: The values that are available are dynamic — they change based on the profile field you choose. For example, if you choose Birth Date as your profile field, you can set values to match anyone within a date range. When using a date range, be sure to put the earlier date first and the later date second. Reversing the date order will render the target group unusable for future editing.
Create an iMIS Activities Target Group
iMIS Activities Target Groups bring in subscribers that have participated in various activities tracked in iMIS. These activities might include meetings, certifications, and committees. Additionally, for some activities, a specific date range can be specified.
Other criteria are brought in based on the type of activity. For example, for Open Meetings, Informz pulls from the Order, Order_Meet, and Order_Lines tables. For Certifications, Informz pulls from the Cert_Register table. For all other Activities Target Groups, Informz pulls from the Activity table.
NOTE: For Closed Meetings, you must use an Activities Search Target Group type. Informz pulls from the Activity table for Closed Meetings.
To create an iMIS Activities Target Group:
- Navigate to Subscribers > Target Groups.
- Click the Folders dropdown list see the list of Target Types available.
- Select iMIS Activities.
- Click Create.
- Click the Activity Type dropdown and select an activity type (Gifts/Pledges, Awards, Dues, Orders, etc.).
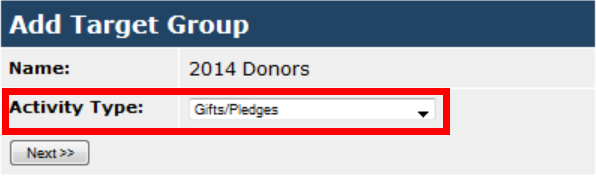
- Click Next.
- For Target Type, set the various options (such as the date range for a donation made or an amount).
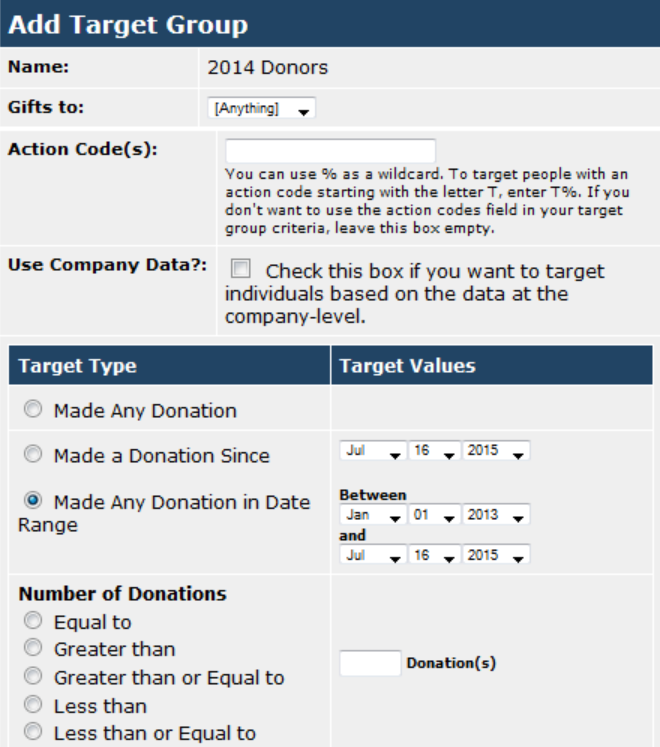
- Click Update.
This will create the new Target Group.
Create an iMIS User-Defined Target Group
Informz can use any user-defined table in iMIS as the source for target groups in Informz. The iMIS user-defined target groups can be used to create target groups using any table designated as user-defined in iMIS as long as the table contains the iMIS ID field.
NOTE: If you are using IPM for iMIS, you must create a user-defined target group for each interest. This will give you additional control over opt-in and opt-out options. You can ultimately use these target groups to include or exclude subscribers from your mailings. For example, if you identify a user-defined target group as 'opt-out,' you can use that target group as a "do not send to" group.
To create an iMIS User-Defined Target Group:
- Navigate to Subscribers > Target Groups.
- Click Create.
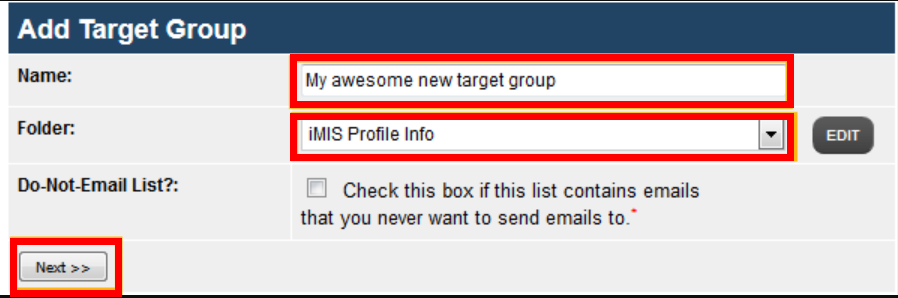
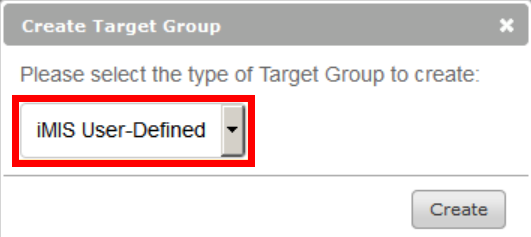
- In the Create Target Group pop-up, click the dropdown list and select iMIS User-Defined, and then click Create.
- In the Add Interest pop-up, enter a Name for your interest.
- Click the Target Group Folder dropdown and select a folder where the target group will reside.
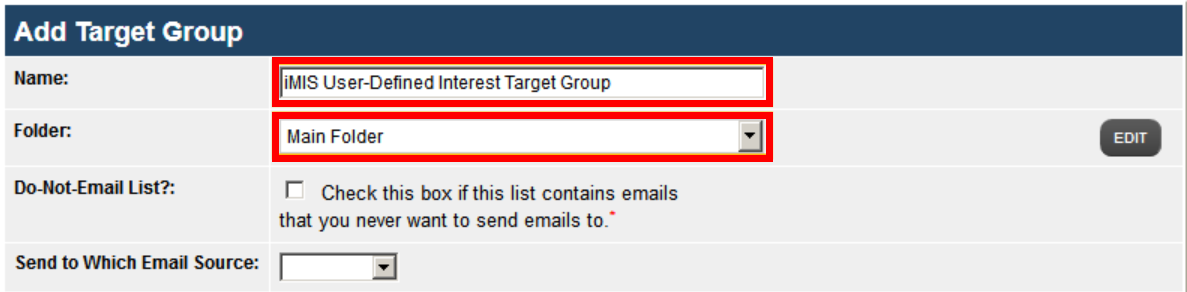
- Optionally, click the Do-Not-Email List checkbox if the list contains emails that should be excluded from the target group mailings.
- Click Next.
- Click the Tables dropdown and select a table source for the target group's user-defined field.
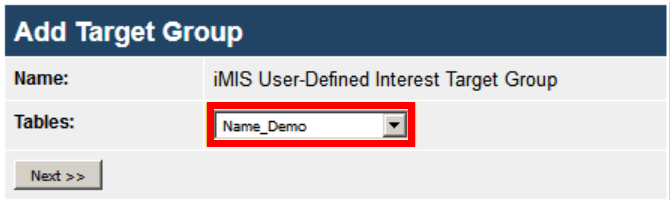
- Click Next.
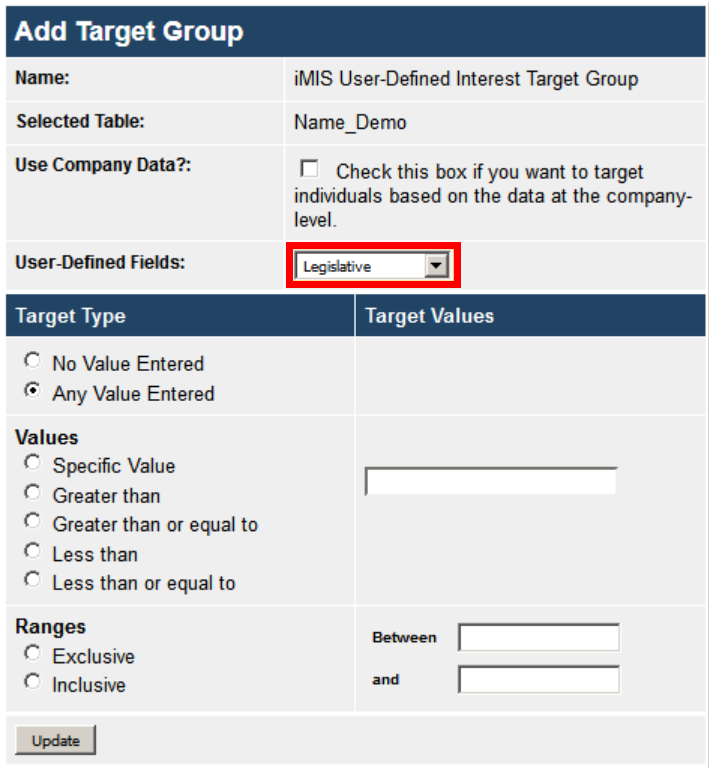
- Click the User-Defined Fields dropdown and select a field for the target group.
- Add any additional Target Type and Target Value details, and click Update to create the target group.
Create an iMIS IQA Target Group
iMIS Intelligent Query Architect (IQA) Target Groups are a great way to use the IQA feature in iMIS for precision targeting.
Set Up IQA Queries in iMIS Using Query Service
- Go into iMIS.
- Create a folder called Informz in the IQA root directory and set the folder security permissions to Allow any type of object in this folder and Everyone Full Control.
- Find the URL to the query service.
The iMIS administrator should be able to provide this. It resembles:
http://www.[Association Domain].org/iMIS15/AsiCommon/services/query/queryservice.asmx.
- Enter the URL in a web browser to test it. It should return a page similar to this:
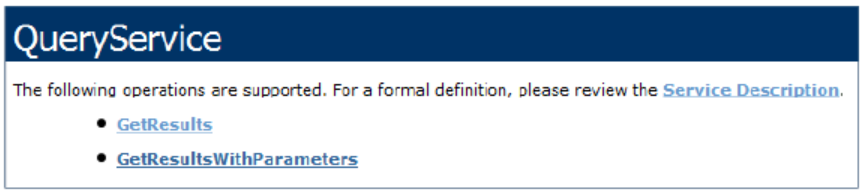
To create an iMIS IQA Target Group:
- Log into Informz with Administrator privileges.
- Navigate to Administration > System Settings.
- Find the section titled Integration Settings. If you don't see this, please create a case to verify that IQA is enabled for your account.
- Enter the URL to the queryservice.asmx web service, and check the Active checkbox.
- Log out of Informz and return to iMIS IQA.
- Create a new IQA query in the Informz folder. Make sure the security tab is set to Share(Everyone).
- Log into Informz and navigate to Subscribers > Target Groups.
- Select iMIS IQA in the Target Group Type folder.
If everything is properly configured, new IQA queries in the Informz folder in IQA will display in Informz. To refresh this list, click Update Target Groups.
IQA Considerations
- iMIS IQA target group syncs do not bring over any new subscribers to Informz. They simply organize existing subscribers.
- New IQA queries in the Informz folder in iMIS automatically appear in Informz.
- The IQA integration does not retrieve personalization data or perform writebacks.
- IQA cannot function independent of the iMIS linked server integration.
SQL View
SQL Views are virtual tables that represent data from multiple database tables and are a powerful targeting asset. Building SQL views in iMIS allows you to use any criteria to create a list. These lists can be used to make very focused and specialized target groups for Informz.
A SQL View is a great alternative to creating an Informz compound target group, in which multiple target groups are combined to make one. Often, a single SQL View can be crafted that includes all desired criteria from across different tables and fields to generate a unique list of members with very specific characteristics.
Create a SQL View in iMIS
A SQL View can be created using more than one table and any other views in your iMIS database using a SELECT statement of any complexity. When creating your SELECT statement, it is important to know that:
- COMPUTE and COMPUTE BY clauses cannot be used.
- An ORDER BY clause cannot be used unless there is also a TOP clause in the select list of the SELECT clause.
- References to a temporary table or table variable are not supported. Therefore, the INTO keyword cannot be used.
For detailed descriptions of other restrictions, refer to your Microsoft® SQL Server™ or MSDE™ documentation.
There are many advantages to using a SQL View as an Informz target group:
- When creating a view, SQL Server™ validates your SELECT statement against the structure of your database to verify the existence of all database objects that are referenced in the view.
- SQL Server™ validates the syntax of your SELECT statement and ensures that all rules for views are being followed.
- You can use any table or view from your iMIS database to create your view.
- After the view has been created, it is easy to create an Informz target group that uses your view.
Informz Rules for iMIS SQL Views
- Creating an iMIS SQL View requires a database administrator (DBA) or a consultant using the SQL Server Enterprise Manager. It is also based on the SQL server and its views in the database. This target group uses the SQL Server Enterprise Manager.
- The only column needed in the SELECT clause of your view is the NAME.ID. Any additional columns are ignored by Informz.
- If the column representing the iMIS ID is not named ID, use an AS clause to ensure that the column is named ID. Below are two examples:
CREATE VIEW dbo.TestView1 AS SELECT ID FROM NAME WHERE STATUS = 'A'
CREATE VIEW dbo.TestView2 AS SELECT BT_ID AS ID FROM TRANS WHERE TRANSACTION_DATE > '1/1/2015'
- Informz does not store the View name from iMIS; it stores the unique database ID that is associated with the View. This is stored in the target_group_values field in Informz.
- Only distinct rows can be included in an iMIS SQL.
- The Informz login used during the bridge-creation process must have SELECT permissions for any of SQL View to be used by Informz.
To create an iMIS SQL View Target Group:
- Navigate to Subscribers > Target Groups.
- Click Create to open the Create Target Group window.
- Click the dropdown list and select iMIS SQL Views.
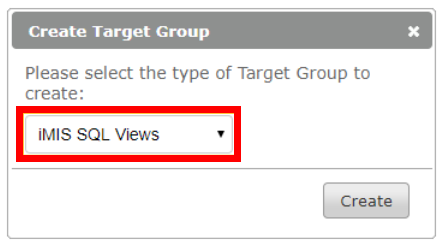
- Click Create. The Add Target Group page opens.
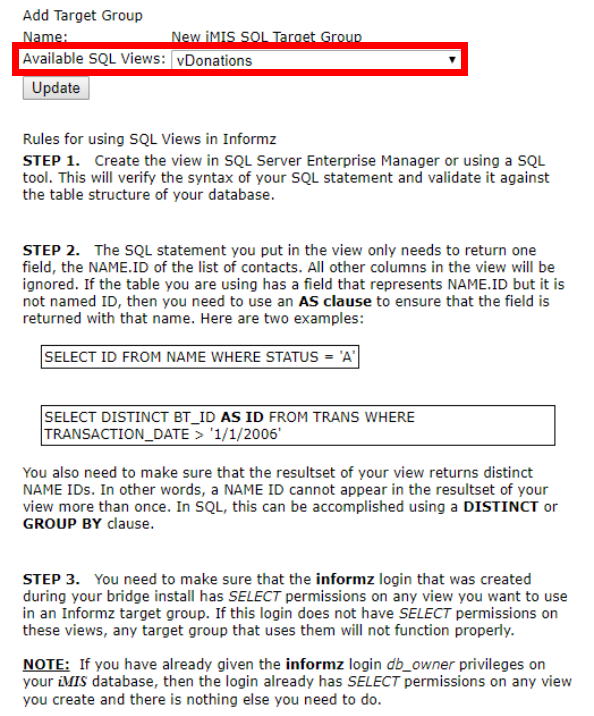
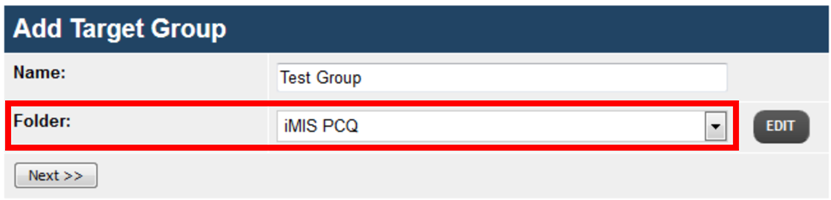
- Enter a target group Name and click the Folder dropdown to select a folder for the target group.
![]()
- Click Next.
- Click the Available SQL Views dropdown and select one of the SQL views to use as the basis for your target group. Click Update to save the target group.
Understanding Subscriber Counts
The number of records returned from your SQL View may not match your Informz target group. This may be caused by one of the following:
- Only member records that have a valid email address are synced between iMIS and Informz.
- Only member records that match the preferred status values from iMIS will sync between iMIS and Informz.
- Informz target groups never unsubscribed email addresses.
Personalization
Personalization data is available in Informz mailings from a SQL View. However, it must be manually entered in the mailing story instead of via the Personalization dropdown. The manual code to type is %%IMIS||UD||viewname.fieldname%% where viewname = name of your SQL View and fieldname = name of the column/field you want to include in the mailing.
Personalizations work on a one-to-one basis. If there is more than one value for an iMIS ID, Informz uses the first value returned from the SQL View.
Troubleshooting
Here are two easy things to check if your SQL View is not returning any counts.
- Ensure that the SELECT permission is being used.
- Identify an ID that should be returned and verify that this record contains a valid email address and has a preferred status that will allow that data to flow into Informz during a sync.
Create an iMIS Ad Hoc Target Group
Ad Hoc queries are customized groupings of data that users create in iMIS. These are useful because these queries can pull data from a variety of tables in iMIS. This brings together disparate groups of data into a single query. Similar functionality can be achieved using iMIS IQA and SQL Views in iMIS.
An Ad Hoc target group represents the “where” clause of a SQL query in the iMIS search results table. This would be considered to be on the client-side.
The Ad Hoc queries in iMIS are available for selection as an Informz target group. When Informz wants to reproduce the data, based on the criteria represented in the Ad Hoc group, it executes the query across the integration bridge yielding the most recent data from iMIS.
While syncing before publishing, Informz refreshes ALL Ad Hoc target groups with the current filter information. This ensures that the latest version of the query from iMIS is being used.
Create an iMIS PCQ Target Group
PCQ allows you to create a custom set of criteria to create a query in your iMIS database which is then available to use in Informz to create a dynamic target group.
To create an iMIS PCQ Target Group:
- Navigate to Subscribers > Groups > Target Groups.
- Click Create.
- Select iMIS PCQ as the target group type.
- Enter a name for the target group and assign it to a folder.
- Select your PCQ report from the dropdown of available reports.

Create an iMIS Zip Code Radius Target Group
All iMIS users create target groups based on a zip code radius ("postal code" in some countries). By entering a zip code and a radius, Informz can create a target group of subscribers who are within x miles of that zip code. A good example of when this would be beneficial is if you are hosting an event, you can focus a special mailing to all of your organization's subscribers within 60 (or 75 or 100) miles of that city.
NOTE: Integration Personalizations must be active in your account to use this feature because the data is drawn from personalization information.
To create an iMIS Zip Code Radius Target Group:
- Navigate to Subscribers > Target Groups.
- Click Create.
- Click the dropdown list and select iMIS Zip Code Radius.
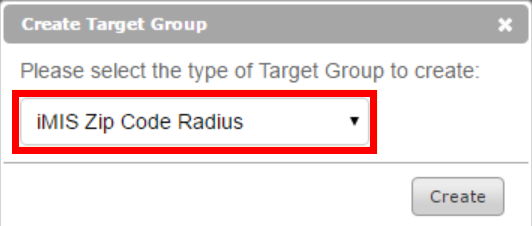
- Click Create.
- Enter a Name, Folder, Radius, Zip Code, and Country for the target group.
NOTE: Australia, Canada, New Zealand, and the United States are the only countries currently available. Also, when you enter a Zip Code, the window expands and displays a Google Map with your specified radius highlighted.
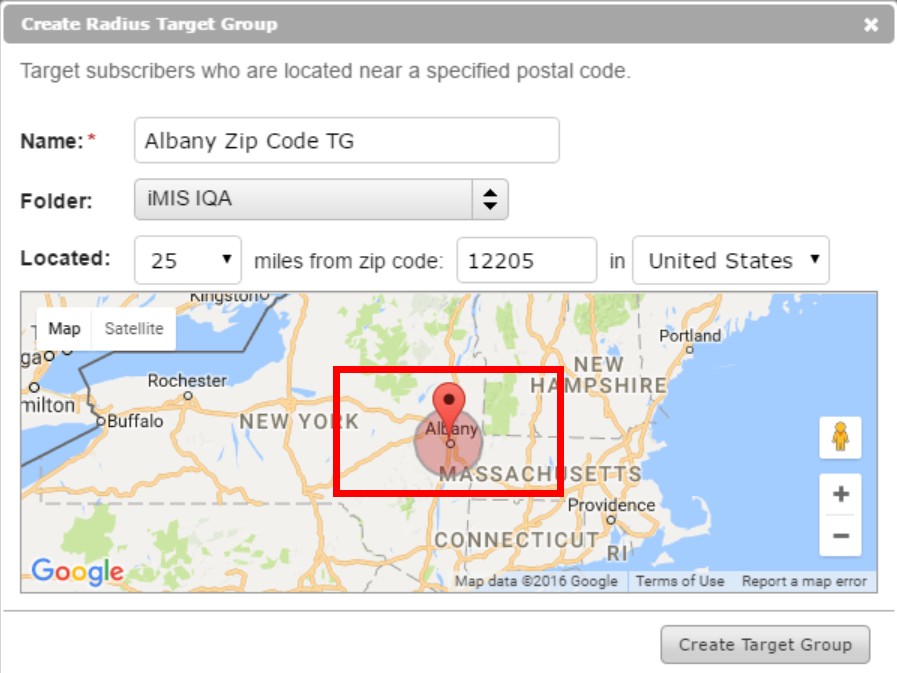
- Click Create Target Group to finalize and create your target group.
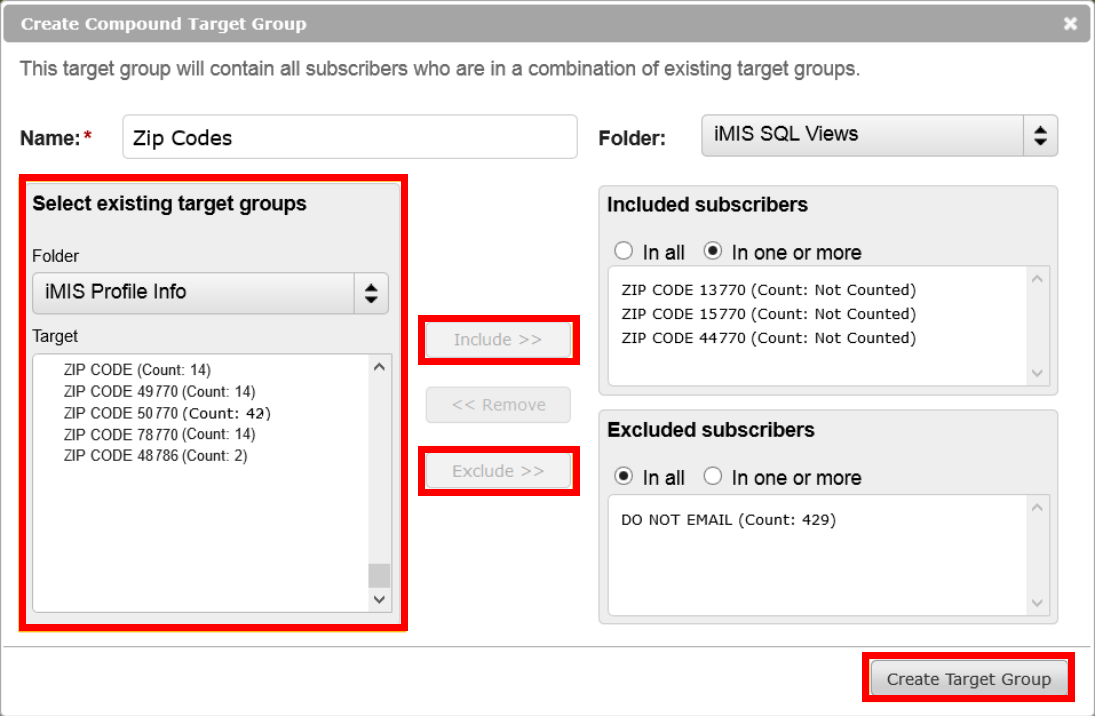
iMIS Target Groups in a Compound Target Group
A compound target group is a collection of target groups brought together to create a new, single target group. Existing target groups — including iMIS target groups — can be included in or excluded from a compound target group in order to really narrow the list of subscribers.
To create a Compound Target Group:
- Navigate to Subscribers > Target Groups.
- Click Create.
- Click the Target Group Type dropdown and select Compound.
- Enter a name for the new target group.
- Click the Select Existing Target Groups Folder dropdown and select an iMIS folder. This displays a list of iMIS target groups.
- To include a target group, select an iMIS target group and click Include.
Repeat this process for each target group you want to include in the compound.
- Select:
- In one or more if you want to have subscribers appear in any of the iMIS target groups.
- In all if you only want to have subscribers that appear in all target groups simultaneously.
- To exclude a target group, select an iMIS target group and click Exclude. Any subscribers in the exclude list that match those in the include list, will be removed from the compound target group.
- Click Create Target Group to save the target group.