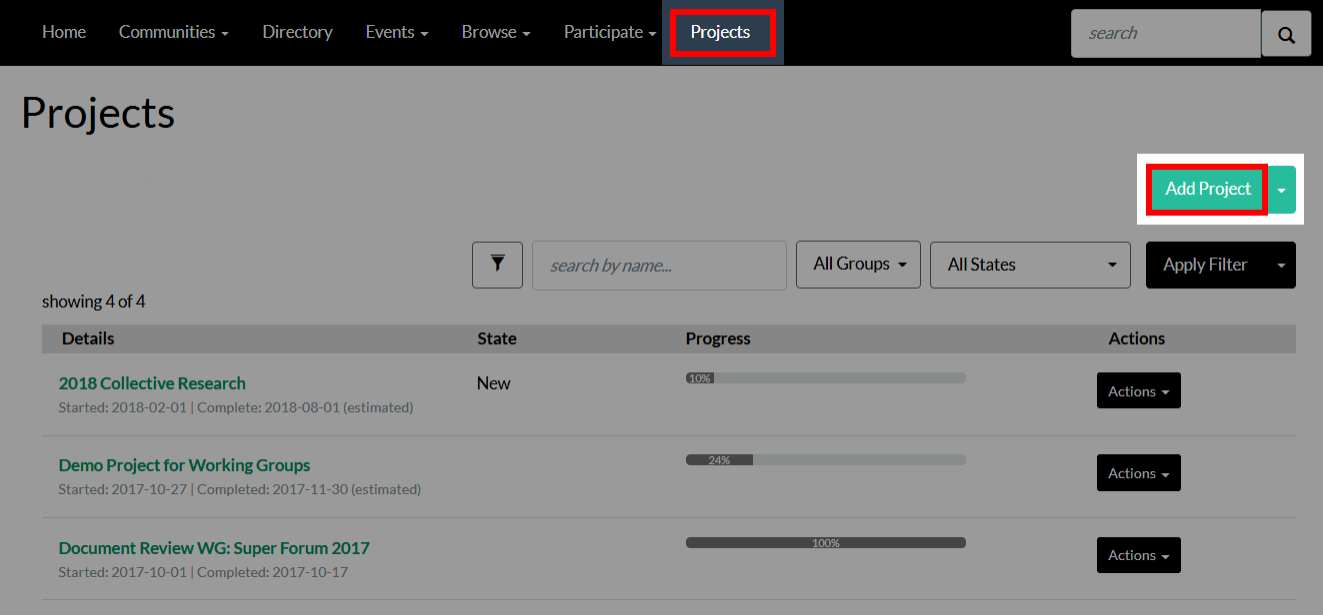
Workspace's various tools enable Higher Logic Thrive Community (Thrive Community) users to collaboratively produce and manage documents important to your organization. The foundational pillar giving admins and leaders oversight and management of documentation goals are Projects. In many ways, Projects are the glue binding Workspace's functionality into a cohesive whole.
Create a Project
Unlike Workspace's other tools, Projects are created and managed outside a community's Workspace: By default, a Project's page is accessible from your Thrive Community site's Navigation Bar:
- Click Projects on your Thrive Community site's Navigation Bar.
- Click Add Project.

- Complete the form to configure your Project.
Options
| Field | Description |
|---|---|
| Details | |
| Title | Give your Project an appropriate title. |
| Project Type |
If Project Types have been created, select the appropriate Type from this menu. NOTE: See Project Types learn more. |
| Description | Provide a short description of your Project, including details like its purpose and goal. |
| Progress Report | While not necessarily always appropriate for new Projects, you can update a Project at any time in the future to give a progress report. |
| Percentage Complete | Enter a number, 0—100, to indicate this Project's overall completion status. A Project is considered complete when set to 100. Update this number as the project evolves so stakeholders can easily track its progress. |
| Start Date | Set the Project's start date. |
| Estimated Completion Date | Set the Project's estimated completion date. |
| Completion Date | This is the Project's official completion date; set this once the Project is over. |
|
Project Fields NOTE: This area only appears if a Project Type is selected. In addition, the fields below are only available if States and/or custom fields have been created for the selected Project Type. |
|
| Project States | The States created for the selected Project Type are available in this menu. These States allow you and other admins to tag Projects with varying degrees of completeness and statuses, allowing admins to update a Project's status throughout its lifecycle. |
| Custom Fields | Any custom fields created for the selected Project Type are listed below the Project States menu. Complete them, as desired. |
| Resources | |
| Assign Community | Select the community Workspace you want to assign this Project to. |
| Project Contact | The primary contact for the community selected above will be listed in this menu. Select them to have this individual notified regarding updates about this Project. |
|
Notifications NOTE: Use these options to determine who should receive a notification when changes are made to the Project (e.g., a progress report is added or updated, the percentage complete is updated, etc.). These are one-off change notifications, not ongoing Project lifecycle notifications. |
|
| Notification Options |
Select who should be notified about Project updates:
|
| CC: |
All email addresses listed here will also receive updates about the Project, allowing you to inform individuals other than the project contact and group chairs. Enter the email addressesseparated by a comma with NO spaces. EXAMPLE: sue@myorg.org,bill@myorg.org |
| Submitter Note | If desired, you can include a note in the change notification. These notes are a great way to provide a summary or rationale for the changes made to the Project. |
- Click Save at the bottom of the page to create your Project.