Ballots enable you to quickly put a finger on the pulse of your community; similar to online polls, use ballots to ask your members questions, ranging from lunch orders and preferred meeting times to election and document approvals. With ballots, you can control voter eligibility, decide who can view voting results, set up email notifications to keep members in the loop, track voting results in detailed reports, and more.
Ballot Types
You can create two types of ballots:
- Approval Ballot - The purpose of these ballots is to determine if the balloting group is prepared to approve a document, specification, or standard for publication or wider review. To this end, this ballot type is pre-configured with the appropriate options for obtaining consensus, and can only be created for uploaded documents.
- General Ballot - On the other hand, General ballots provide more flexibility, allowing you to create as many custom voting options as desired, and are ideal for receiving any type of feedback from your members you may need.
Let's learn how to create General and Approval ballots and look at their configuration options.
Create a General Ballot
On the Ballots tab:
- Click Add.
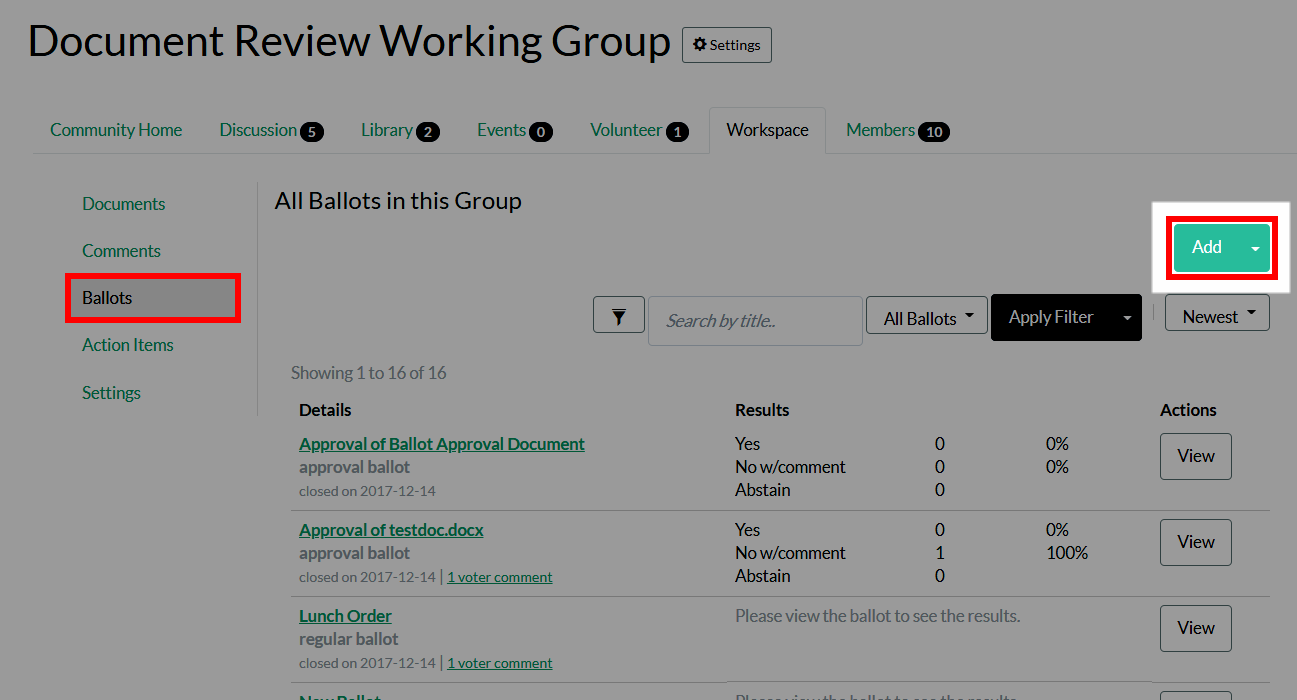
- Complete the form.
Options
| Field | Description |
|---|---|
| Details | |
| Select Ballot Template |
If any General ballot templates have been created, you'll be able to select one from this menu to automatically configure your new ballot with its settings. NOTE: Ballot templates can be created by clicking the Save As Template button at the bottom of the page. |
| Title |
The ballot's display name. |
| Question |
The ballot's question. EXAMPLE: "What time do you want to meet this week?" |
| Description |
An optional description can be added, if desired, providing context or background about the ballot. NOTE: You're limited to 750 characters. |
| Ballot Options |
General ballots provide more flexibility then Approval ballots: While you can create simple Yes/No/Abstain ballots if you want, you can also create a completely custom ballot with any number of custom choices. NOTE: The Abstain option provides a way to collect comments on a document for people who may not be eligible to vote on the ballot itself. This is a safety net for people who need to be able to voice their opinion but who aren't an official voting member on the ballot itself. After deciding whether to create a Yes/No or Custom ballot, specify a comment setting for each choice: Whether users are (1) not allowed to comment, (2) are required to comment, or (3) can choose whether or not to comment with their selection. These settings allow you to, for example, force users to leave a comment if they select a particular option (e.g., if you allow "other" as an option, to provide more detail), ensuring you receive feedback about their selection. For Custom ballots, you can add as many options as you want by clicking the +. In addition, you can control whether voters can only select a single option, whether they must select a specific number of options, or whether they can select up to a specific number of options. |
| Passing Percentage |
This is the percentage of Yes votes that must be reached for this ballot to pass. A default is configured at the Group level, but you can update it, if desired. NOTE: This option can disabled at the Group level, and may not be available. |
| Percentage of Votes Returned |
This is the percentage of votes that must be cast for this ballot to pass. A default is configured at the Group level, but you can update it, if desired. NOTE: This option can disabled at the Group level, and may not be available. |
| Opening/Closing Date | Use these two menus to select the time period during which your ballot is open. |
| Time Zone | Select which time zone to use to schedule the open, close, and reminder times for this ballot. |
| Voter Eligibility | |
| Who Can Vote |
This is where you control who can participate in this ballot:
You can click the Roster link to see who is an eligible voting member in the group. |
| Meeting Attendance Rules |
If any meetings have been flagged as required for voting eligibility, this is where you can enforce those rules for this ballot. Simply check the box and specify how many of the last X number of meetings marked as counting toward voter eligibility users must have attended in order to vote. |
| Voter Management |
Because you never know when members may join or leave a group after a ballot opens, these options allow you to control whether these members should automatically be added or removed as eligible voters for this ballot. If you select YES, the eligible voter list will automatically be updated to reflect roster changes until the ballot closes. NOTE: Even though the system will allow you to do so, you cannot enable meeting attendance rules AND set Voter Management to YES. Why? Let's say you have a ballot that's opening on a Monday, and you have meeting attendance rules that dictate users must have attended the last 3 out of 6 meetings. Because the system can only determine voter eligibility based on the meetings that have already taken place on the date the ballot opened, you can't add a new person to the group on a Tuesday and expect them to be able to vote because the system won't be able to check their meeting attendance. The ballot will only be sent out and visible to those people who were already in the group. |
| Optional Configuration | |
| Official Ballot | Flags this as an Official ballot. Leave unchecked for informative ("when should group members meet?") or trivial ("what should we have for lunch?") ballots. |
| Revoting Support |
Controls whether users can:
|
| Related Projects | If another Project relates to this ballot, select it from this menu and click Add. Repeat this step to add additional Projects. This makes it easy for voters to understand how this ballot may impact another Project, and provides easy access to the selected Project(s). |
|
Referenced Items If there are pertinent documents, actions items, or other ballots pertaining to this ballot you want to include, you can reference them here. You can also upload a new document or file directly. A link to the file will be provided on the ballot's page. |
|
| Ballot Results | |
| Results Visibility |
Decide whether results visibility is:
If Configurable, you can configure the remaining three options; if Administrators Only, those three options are hidden. |
| Sharing Results | Ballot creators can view detailed results at any time. You can enable the options here to define who else can see the ballot's results. |
| Results Availability |
Decide whether voting results can be seen as soon as the ballot opens (i.e., as soon as they're submitted) or not until the ballot is closed. Depending on the type of ballot you're creating, you may not want people to be able to see how everyone else is voting while the ballot is open (e.g., you're voting on who should be the new Group Chair). |
| Results Style |
Choose whether to (1) display results in a detailed list of voters and their vote or (2) show a simple summary of the results. This option has inherit privacy implications, so depending on what people are voting on, they may not want their vote known by others. In this case, set this to the summary option. |
|
Email Notifications This is where you configure who receives email notifications about the ballot. For both eligible voters and non-voters, you can choose to send a notification when the ballot opens, closes, AND set three custom reminders for specific dates/times. Keep in mind that if you enable custom notifications, you must set all three of them. Also, these reminders are only sent to those who have not yet voted, preventing people who already have voted from being spammed needlessly. These custom notifications are a great way to prompt people who have not yet voted to do so leading up to the ballot's closing. |
|
- If you want to save this ballot's configuration as a template for future ballot creation, click Save As Template at the bottom of the page. When you're ready to create the ballot, click Continue.
- A summary of your ballot's details are shown on the resulting page. If you're happy with them, click Accept to create the ballot or Back to make changes.
Create an Approval Ballot
NOTE: Comments must be enabled in order to create Approval ballots. To do so:
1. Navigate to Admin > Workspace > Settings > Manage Workspaces.
2. Click the modify link associated to the Workspace you want to create Approval ballots for.
3. Scroll down to the Optional Features section and set the Comments Enabled? option to YES.
4. Click Modify Group at the bottom of the page to save your change.
On the Documents tab:
- Click the Actions menu for the document you want to create an Approval ballot for.
- Select Create Approval Ballot.
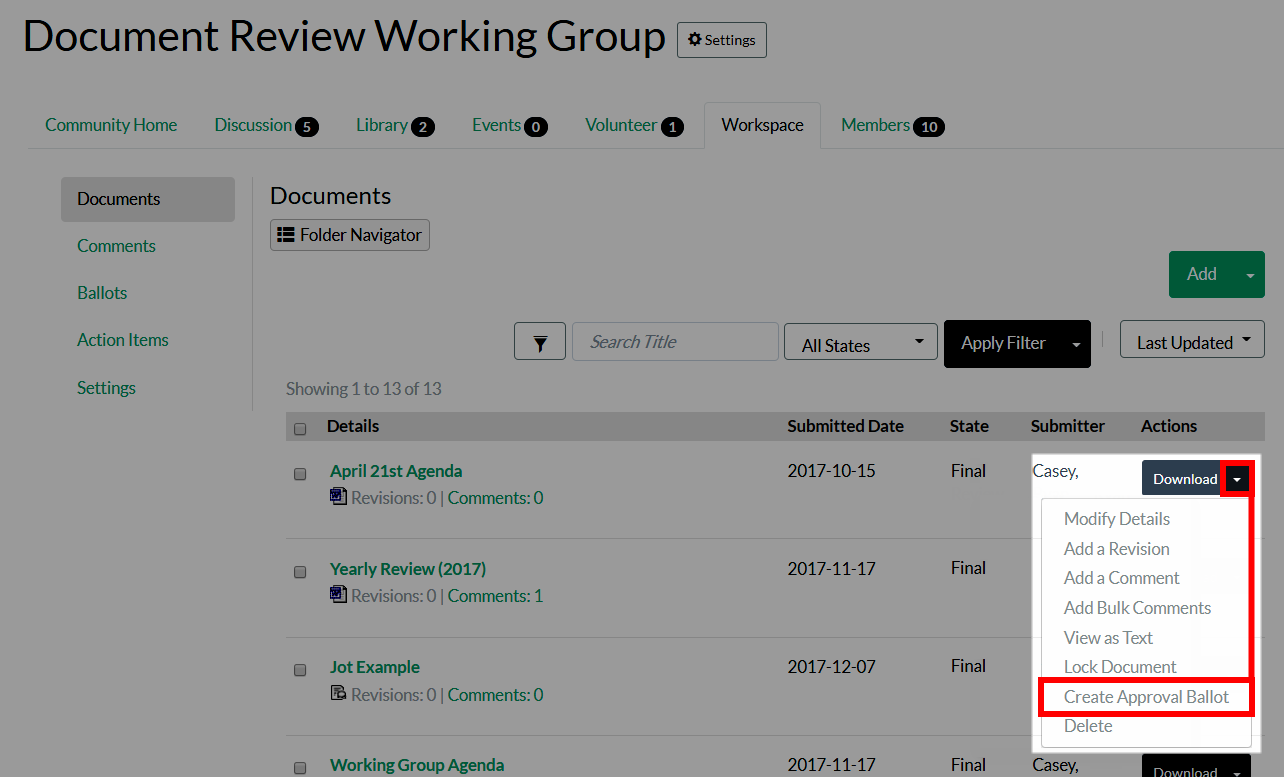
- Complete the form.
Options
| Field | Description |
|---|---|
| Ballot Details | |
| Select Ballot Template |
If any Approval ballot templates have been created, you'll be able to select one from this menu to automatically configure your new ballot with its settings. NOTE: Ballot templates can be created by clicking the Save As Template button at the bottom of the page. |
| Title |
The ballot's display name. An appropriate Approval ballot title is automatically added ("Approval of *document title*"), but you can modify it, if desired. |
| Question |
The ballot's question. An appropriate Approval ballot title is automatically added ("Should *document title* be approved?"), but you can modify it, if desired. EXAMPLE: "Are the changes in this document sufficient to warrant approval?" |
| Description |
An optional description can be added, if desired, providing context or background about the ballot. NOTE: You're limited to 750 characters. |
| Ballot Options |
While you can create your own custom options for General Ballots, Approval Ballots only have three voting choices, and they cannot be changed: Yes, No, and Abstain. NOTE: The Abstain option provides a way to collect comments on a document for people who may not be eligible to vote on the ballot itself. This is a safety net for people who need to be able to voice their opinion but who aren't an official voting member on the ballot itself. Here, you must specify a comment setting for each: Whether users are (1) not allowed to comment, (2) are required to comment, or (3) can choose whether or not to comment with their vote. These settings allow you to, for example, force users to leave a comment if they vote NO, ensuring you receive feedback as to why they voted that way. |
| Document for Approval | The document you're creating the ballot for is listed here, allowing users to download it directly on the ballot's page. |
| Passing Percentage |
This is the percentage of Yes votes that must be reached for this ballot to pass. A default is configured at the Group level, but you can update it, if desired. NOTE: This option can disabled at the Group level, and may not be available. |
| Percentage of Votes Returned |
This is the percentage of votes that must be cast for this ballot to pass. A default is configured at the Group level, but you can update it, if desired. NOTE: This option can disabled at the Group level, and may not be available. |
| Opening/Closing Date | Use these two menus to select the time period during which your ballot is open. |
| Time Zone | Select which time zone to use to schedule the open, close, and reminder times for this ballot. |
| Voter Eligibility | |
| Who Can Vote | This area indicates only voting members are eligible to vote on Approval ballots in this group. You can click the provided link to see who is a voting member in the group. |
| Meeting Attendance Rules |
If any meetings have been flagged as required for voting eligibility, this is where you can enforce those rules for this ballot. Simply check the box and specify how many of the last X number of meetings marked as counting toward voter eligibility users must have attended in order to vote. |
| Voter Management |
Because you never know when members may join or leave a group after a ballot opens, these options allow you to control whether these members should automatically be added or removed as eligible voters for this ballot. If you select YES, the eligible voter list will automatically be updated to reflect roster changes until the ballot closes. NOTE: Even though the system will allow you to do so, you cannot enable meeting attendance rules AND set Voter Management to YES. Why? Let's say you have a ballot that's opening on a Monday, and you have meeting attendance rules that dictate users must have attended the last 3 out of 6 meetings. Because the system can only determine voter eligibility based on the meetings that have already taken place on the date the ballot opened, you can't add a new person to the group on a Tuesday and expect them to be able to vote because the system won't be able to check their meeting attendance. The ballot will only be sent out and visible to those people who were already in the group. |
| Optional Configuration | |
| Official Ballot | Flags this as an Official ballot. Leave unchecked for informative or trivial ballots. |
| Commenting Permissions on Approval Document |
This is where you set who can add and view comments on this ballot and the associated document. NOTE: Changes made to this setting affect not only this ballot but also the comment permissions for the attached approval document. |
| Revoting Support | Decide whether users can only vote once or be able to change their vote while the ballot is open. |
| Related Projects | If another Project relates to this ballot, select it from this menu and click Add. Repeat this step to add additional Projects. This makes it easy for voters to understand how this ballot may impact another Project, and provides easy access to the selected Project(s). |
|
Referenced Items If there are pertinent documents, actions items, or other ballots pertaining to this ballot you want to include, you can reference them here. You can also upload a new document or file directly. A link to the file will be provided on the ballot's page. |
|
| Ballot Results | |
| Sharing Results | Ballot creators can view detailed results at any time. You can enable the options here to define who else can see the ballot's results. |
| Results Availability |
Decide whether voting results can be seen as soon as the ballot opens (i.e., as soon as they're submitted) or not until the ballot is closed. Depending on the type of document the Approval ballot is regarding, you may not want people to be able to see how everyone else is voting while the ballot is open. |
| Results Style |
Choose whether to (1) display results in a detailed list of voters and their vote or (2) show a simple summary of the results. This option has inherit privacy implications, so depending on what people are voting on, they may not want their vote known by others. In this case, set this to the summary option. |
|
Email Notifications This is where you configure who receives email notifications about the ballot. For both eligible voters and non-voters, you can choose to send a notification when the ballot opens, closes, AND set three custom reminders for specific dates/times. Keep in mind that if you enable custom notifications, you must set all three of them. Also, these reminders are only sent to those who have not yet voted, preventing people who already have voted from being spammed needlessly. These custom notifications are a great way to prompt people who have not yet voted to do so leading up to the ballot's closing. |
|
- If you want to save this ballot's configuration as a template for future ballot creation, click Save As Template at the bottom of the page. When you're ready to create the ballot, click Continue.
- A summary of your ballot's details are shown on the resulting page. If you're happy with them, click Accept to create the ballot or Back to make changes.
Ballot Templates
Because Approval and General ballots include quite a few configuration options, Workspace allows you to create templates. Ballot templates make creating similar ballots even easier, as most of the work is already done for you, typically leaving you to only tweak a few details. Templates are especially ideal for reoccurring ballots, like monthly meeting polls where you want to track information such as timing or preferred meals.
NOTE: Templates are specific to Approval and General ballots, so templates created for General ballots can't be used for Approval ballots and vice-versa.
Create a Ballot Template
Templates can be created during the ballot-creation process with an additional click of a button. All you need to do is:
- Click the Save As Template button at the bottom of the Add Ballot page to save your current configuration settings as a template to use in the future.
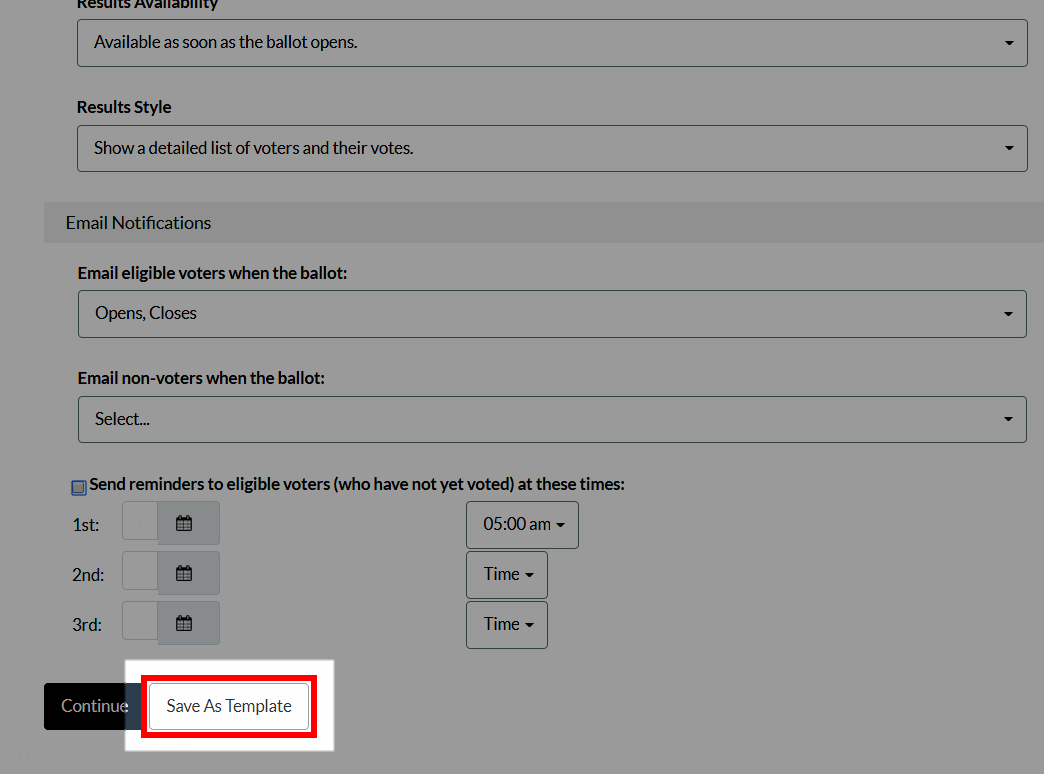
- Name your template in the pop-up, and then click OK.
Use a Ballot Template
After you've created a template, the Select A Template menu is available when creating a new ballot, containing all templates for that ballot type.
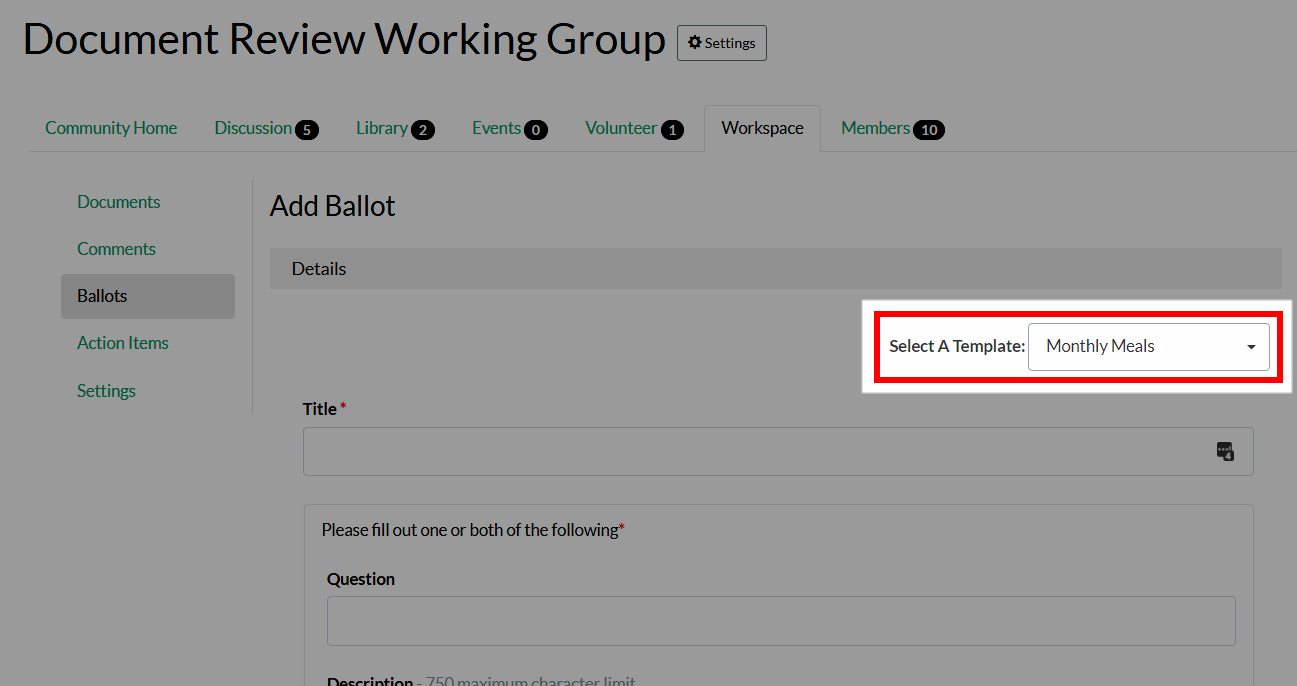
EXAMPLE: If you've created three General ballot templates, they'll be listed in the Select A Template menu when creating a new General ballot. Conversely, if you haven't created a single Approval ballot template, the Select A Template menu will not be available when creating a new Approval ballot.
Ballot Voting
NOTE: You must have the proper role and privileges in a group to vote on a ballot.
On the Ballots tab:
- All ballots open for voting are indicated as such, and include an associated Vote button. Click Vote for the desired ballot.
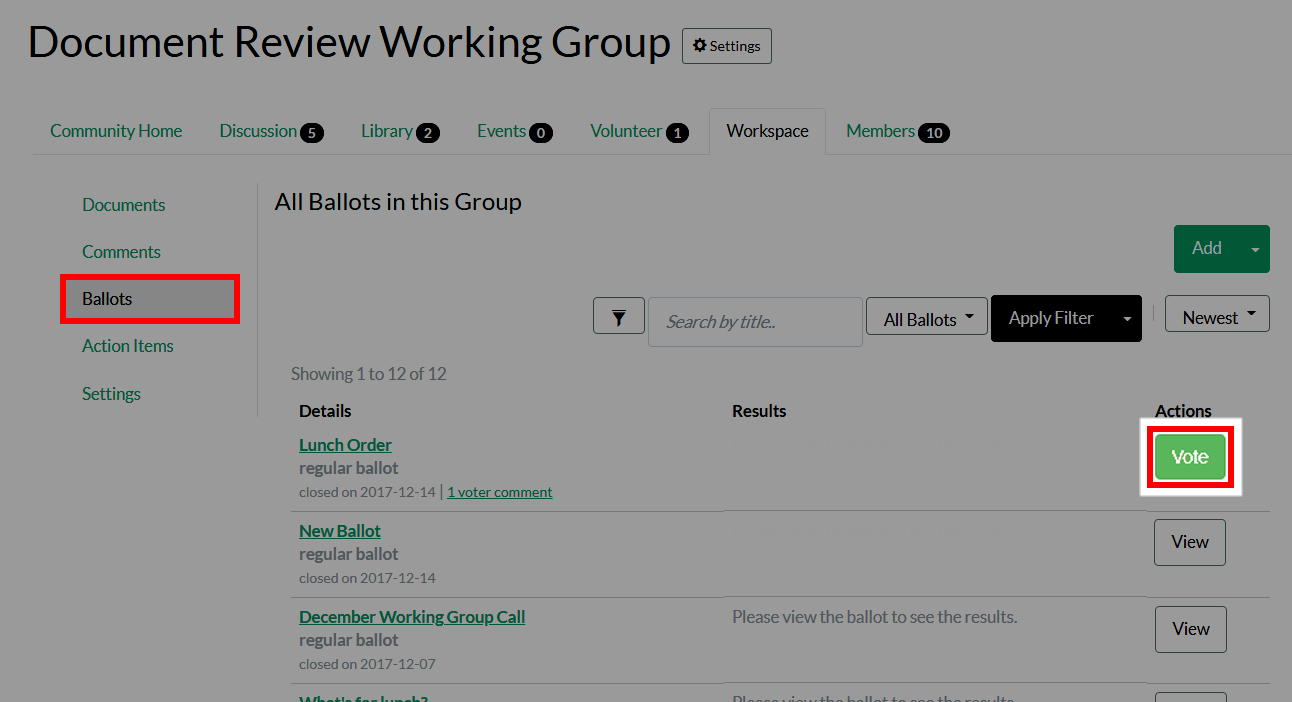
- Read the ballot's details.
- Enter all necessary information, including your option(s) and comment(s) (if available).
- Click Vote.
NOTE: A Vote button indicates you'll have the ability to update your vote while the ballot is open; a Cast Final Vote button indicates you won't have the option to update your vote after casting it.
Viewing Voting Results
NOTE: You must have the proper role and privileges in a group to view voting results.
There are a few ways to track the results of your ballots:
By Individual Ballot
On the Ballots tab:
- Click the ballot you want to view results for.
- At the bottom of the page, a breakdown of the ballot's votes are provided in a few different ways:
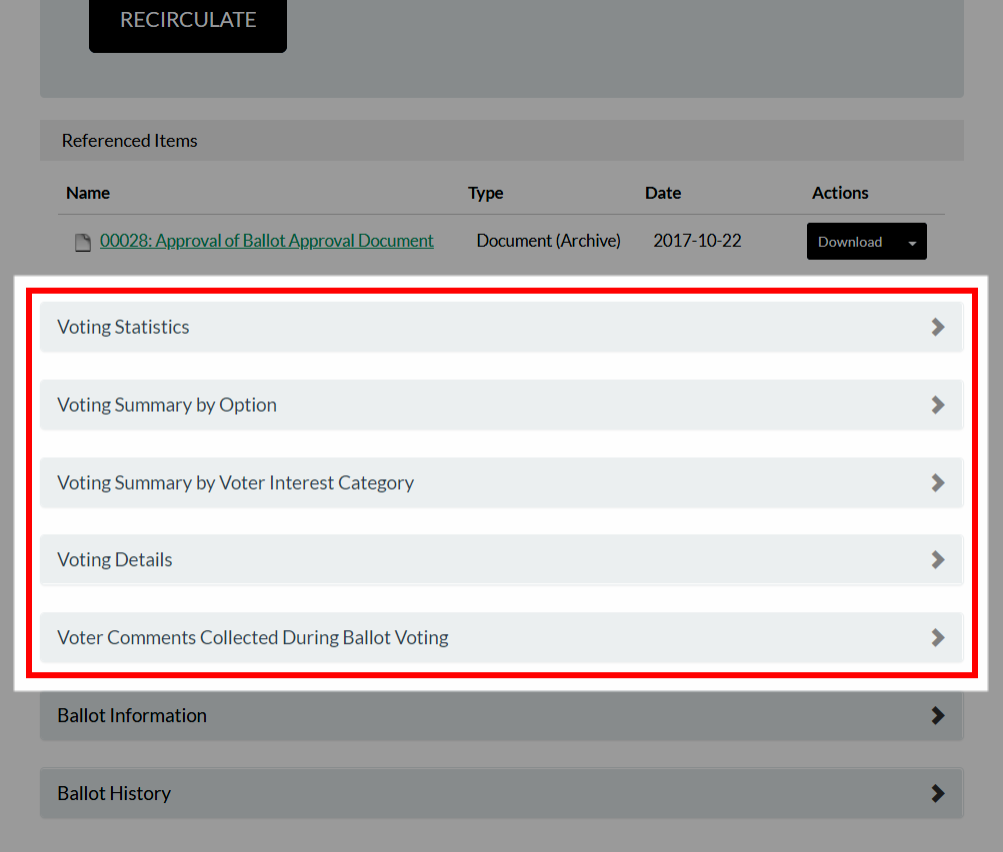
- Voting Statistics - Shows the total number of votes cast (excluding abstentions), along with a breakdown of the number of eligible members who voted and the number of eligible members who haven't voted. This is an easy way to quickly see how many users still have yet to vote. You can then see the specific people who haven't yet voted in the Voting Details area.
- Voting Summary by Option - For each ballot option, shows the (1) number of votes and (2) percentage of total votes it received. This allows you to more easily analyze results on a per-option basis.
- Voting Summary by Voter Interest Category - Shows a breakdown of votes by interest category.
- Voting Details - Lists each member who voted, along with their vote, the time they voted, and links to view any comments they provided. (This information is only available to those with the proper role and privileges.)
- Voter Comments Collected During Ballot Voting - Lists any comments made during voting, along with the submitter, subject, the comment itself and any response(s), and its status.
By Time Period
On the Ballots tab:
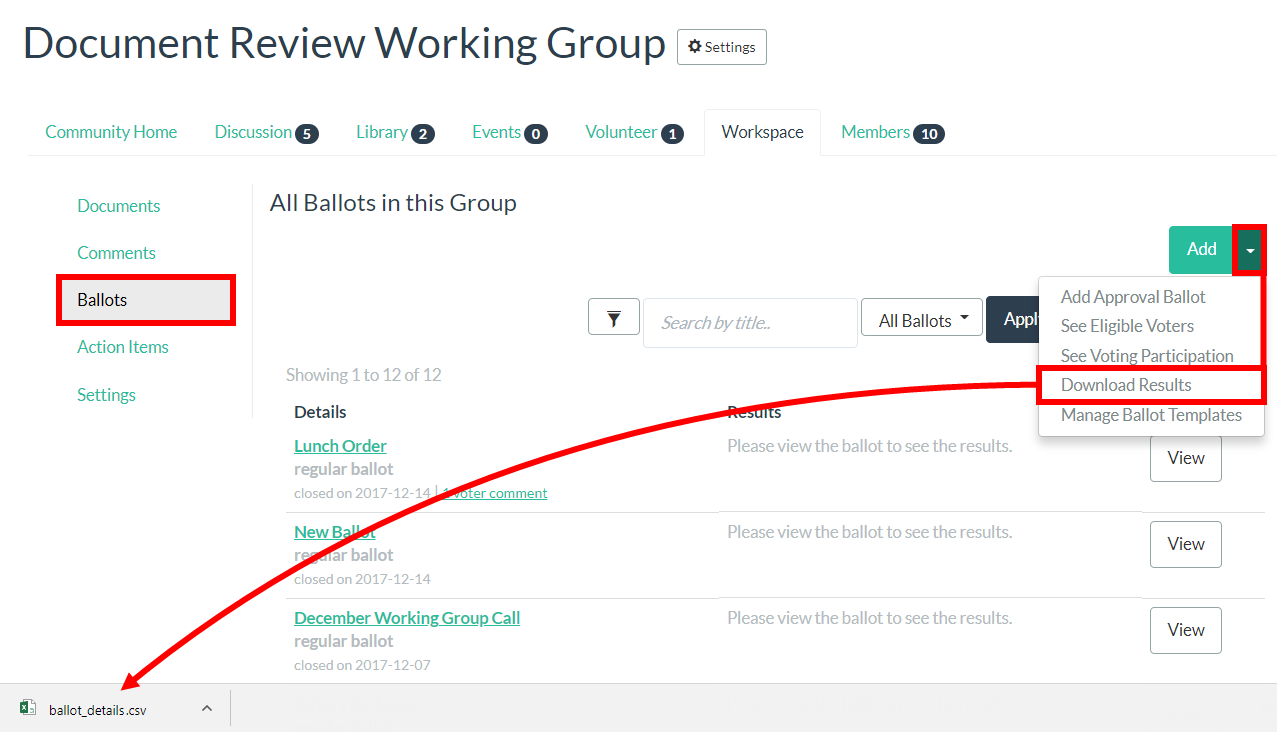
- Click the Actions menu.
- Select See Voting Participation.
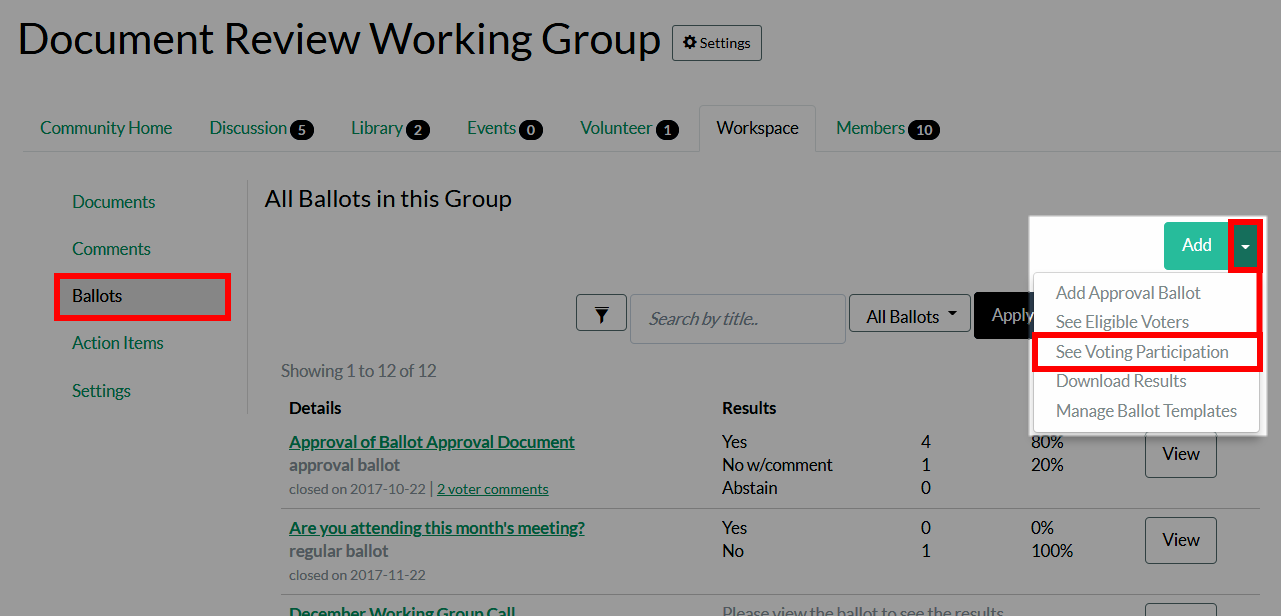
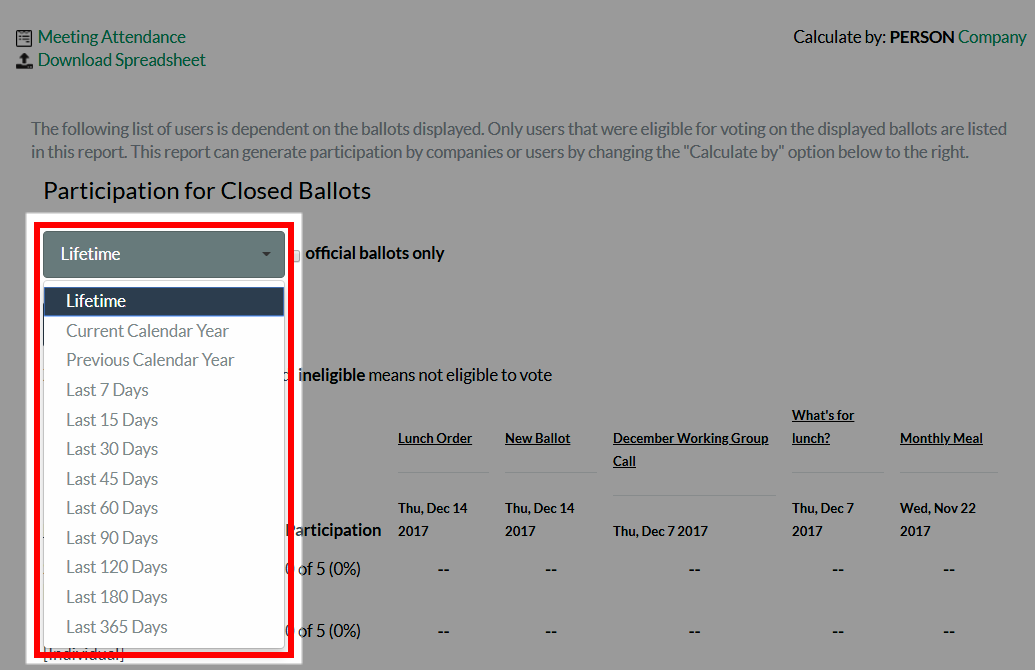
- Select the desired time period from the menu and click Display to view a list of all people who've voted, by ballot, within that time frame.
By Downloading a Spreadsheet Showing Participation Among all Ballots
On the Ballots tab:
- Click the Actions menu.
- Select Download Results. The .CSV file is added to your Downloads folder, and should be visible in your web browser, as shown below. Click the file to open it.
