NOTE: Higher Logic recommends using a Landing Page instead of a Data Input Form. Landing Pages offer more design options, and greater flexibility and functionality. Explore their versatility in the Landing Pages section of our knowledge base!
Your Higher Logic Thrive Marketing Professional (Thrive Marketing Professional) account has a default Data Input Form (a "subscription form") which enables people to subscribe to your organization's messages. When someone subscribes, their email address is added to a target group in your account, and that person will be included in mailings to that target group. This form can be:
- embedded on a web page (such as on your organization's website),
- linked to in a message, and
- shared via social media.
This article describes how to access your Data Input Forms, how to manage them in your account, and how to create a form.
Access your Data Input Forms
In addition to the default Data Input From, you can create your own forms, and manage them along with the default.
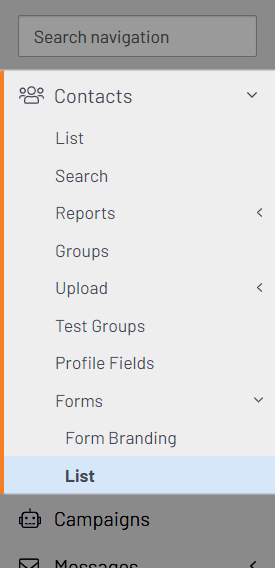
- Navigate to Contacts > Forms > List.
The Data Input Forms page lists the default Form (Default Subscription Form) and any others that have been created in your account.
- The header row of the list indicates the various Form properties that you can manage. These are described in Manage your Forms, below.
- Check the Show Deleted Input Forms box to display deleted Forms.
Forms list notes
When naming new and copied Forms, keep in mind the following points.
- Default Subscription Form - this always displays at the top of the list.
- Sort order - the following sort order is automatically applied to the other Forms.
- names that begin with a non-alphabetic, non-numeric character (e.g., !, #, *, $, #, etc.), then
- names that begin with a numeral, and finally,
- names that begin with a letter.
Manage your Forms
You can manage several aspects of a Form, including:
- customize its appearance,
- configure it to collect the data you want, and
- specify its host URL.
- Click an icon (e.g., notebook-and-pencil, globe, or clipboard-and-pencil) to manage that property of the Form.
TIP: Some of the management pages open in the same tab; others, in a new tab. Consider using the right-click "new tab" option in order to avoid accidentally closing a tab that you're still working in.
Branding
Branding is how you manage the appearance of a Form. It can include custom HTML, colors, and logos. Your Thrive Marketing Professional account includes a customized, default Form Branding that was specifically designed for your organization.
Notes
- Higher Logic recommends that adding custom HTML code be performed by only those users who have web design/CSS experience.
- Some aspects of the branding (such as header colors, font, font size, and some of the default language) are hard-coded and can be changed by Higher Logic staff only. If there are changes that you'd like made to your Form Branding, create a case to request assistance from the Support Team.
Custom Form Branding
The ability to create a custom branding for Forms was deprecated in 2020, in favor of the more versatile Landing Pages. Accounts with custom branding configurations that pre-dated the deprecation can continue to:
- use and apply those custom brandings (via the Form Branding dropdown when creating and modifying a Form); and
- manage their custom brandings on the Contacts > Forms > Form Branding page.
Change your Form Branding
You can makes changes to your default Form Branding.
- Click Default in the Branding column.
- On the editing page, make the changes to your branding.
IMPORTANT: The Custom HTML Information section (intentionally removed below) should be used by only those users who have web design/CSS experience. Incorrect coding could result in unexpected display and submission results.
- Click Update to apply your changes.
- Test the form to ensure your changes are applied.
Modify
Use this option to make changes to this Form's settings.
TIP: All of the settings on the set-up page are optional; they are described in the table below.
| Setting | Description |
|---|---|
| Modify Input Form | In this section, you can:
|
| Personal Info/ Demographic Options |
In this section, you can:
|
| Interest Options | In this section, you can:
|
| Email Notifications | In this section, you can:
|
| Confirmation Mailing | In this section, you can:
|
| Triggered Folder | In this section, you can:
|
- Click Update to save the settings and return to the list page.
Profile Info
Use this option to set up and manage which subscriber data and preferences are captured on this Form.
NOTE: An email address field is automatically added to the Form; it is a required field.
TIP: You can manage these field types on the Contacts > Profile Fields page. Any fields created on that page can be included on a Form. See Create & Manage Profile Fields to learn more.
| Option | Description |
|---|---|
| Personal Info | Add these fields to capture personal information such as first name, last name, and date of birth. |
| Demographics | Add these fields to capture "demographic" information that is limited to a predefined set of values, such as a list of states or countries. |
| Statement | Add this to include a statement that you create in a WYSIWYG editor in which you can customize and format text, images, links, and other options. |
| Interests | Add these fields to capture subscriber interests in order to more easily organize them into groups for more targeted mailings. |
| Opt-Outs | Add these fields to give subscribers a simple mechanism by which to opt out of certain types of messages from your account, as opposed to globally unsubscribing from all of your messages. |
On the set-up page, click:
- an Add button to add a field of that type to the Form (refer to Configure the field, below),
- a Modify icon to make changes to an existing field (refer to Configure the field, below), and/or
- a Delete icon to remove that field from the Form.
Configure the field
When you add/modify the Personal Info and Demographic fields, the following configuration page opens.
NOTE: The add/modify page for Interests has only the dropdown selector and the Order field.
To configure a field:
- Click the dropdown and select a field.
- Check the box if you want this field to be required.
- Accept the default Display settings or set the location, spacing, and order options.
- Click Update to save the settings and return to the list page.
Host
Use this option to generate the HTML code that is necessary in order to have the Form hosted on a web site. You can also specify a site that subscribers will be automatically sent to after submitting the Form (a Return URL).
TIP: The Return URL is a great way to immediately engage with subscribers. Consider redirecting them to a discussion/blog page or an events calendar.
- Click the icon in the Host column to open the HTML page.
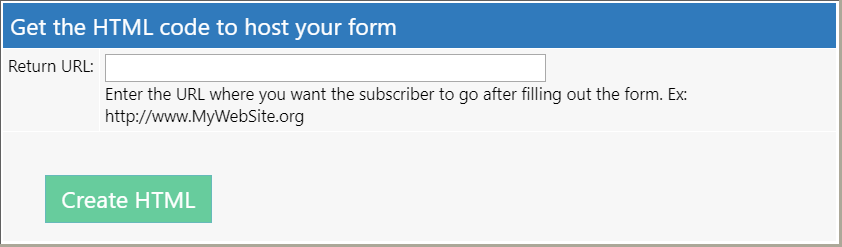
- Optionally, specify a URL to which subscribers will be sent after submitting the Form.
- Click Create HTML to generate the HTML code. The page expands to reveal the code.
- Copy the code and place it on the web page that will host the Form.
Notes
- The HTML page has default "Thank You message" code at the bottom of the page. Feel free to personalize and include this on your embedded Form.
- If you specified a Return URL, you can check it in the "input" line type="hidden" name="returnUrl" value="www.your-return-URL.org?zmsg=1" near the bottom of the code.
Be sure to verify that the Form displays as expected on the host page and that it works correctly.
Test
Use this option to preview how the Form will display and verify any post-submissions actions.
Recommended test settings
For the test, consider setting the following options so that you can verify the functionality of the "notification" and "confirmation" features.
- Modify the Form.
- Specify your email address and check the highlighted option.
- Select a mailing and choose the highlighted option.
- Click Update. You're ready to test the Form.
Test the Form
- Click the icon in the Test column.
A preview of the Form opens in a new tab.
- Review the Form to make sure that it displays as expected, especially:
- the branding is correct and appropriate, and
- the fields are in place and reflect the properties that were set in the Configure the field section:
- field labels,
- dropdown contents,
- field order, and
- statement text and links.
- Complete the various fields and submit the Form.
Post-test checks
After testing the Form, it's a good idea to confirm that all of the associated post-submission actions have executed as expected.
- If you set up the "notification" and "confirmation" features (as suggested above in Recommended test settings), check your email to verify having received the associated messages.
- If you included any Interests on the Form and chose them during the test, you can:
- Navigate to Contacts > Groups, then select Interests from the folder dropdown. Hover on the menu icon of a Group and select Info. Click the Subscribers tab, locate your email address, and verify your test activity in the Modify Date column.
- Navigate to Contacts > List, then select your listing and click the Interests button. Your current Interests subscriptions are selected in the list; verify that the Interests you selected on the test Form are selected.
Copy
Use this option to copy an existing Form as the basis for a similar one. This is beneficial and time saving if you want similar Forms with only slight differences.
- Click the icon in the Copy column of the Form you want to replicate.
- Accept the "Copy of" name or specify a new name for the copy; click Ok.
The page refreshes and the copy displays in the list.
- Use the Branding, Modify, and Profile Info options to customize the copy.
Delete and undelete
Use these options to manage Forms that you no longer, or seldom, use. This is beneficial for keeping the list tidy and manageable if you have a lot of Forms.
Notes
- You cannot delete your account's default Form.
- The delete action is actually more like a "hide" or "remove from list" action. The Form no longer displays but is still available and can be undeleted, as described below.
TIP: If you have Forms that are seldom used, consider renaming them (instead of deleting them) to "alphabetically demote" them in the list. For example, append z_ to a Form's name (e.g., z_Subscription Form_2022) to force it lower in the list.
To delete a Form:
- Click the Delete icon.
- On the confirmation prompt, click Ok.
The page refreshes and the Form is removed from the list.
TIP: If you ever need it again, you can undelete it, as described below.
To undelete a Form:
- Check the Show Deleted Input Forms box to display deleted Forms.
Any Forms that have been deleted now display in the list (in their sort position). The name is bold, red text and an undelete icon displays in the Delete column.
- Click the undelete icon.
- On the confirmation prompt, click Ok.
The page refreshes; the Form name and management-option icons display as they do for other Forms.
NOTE: The Show Deleted... checkbox remains checked and other deleted Forms continue to display; they can be undeleted as described above.
URLs for web site
The system automatically generates two URLs for each Form, as shown below.
- Each pair of URLs has a unique ID; note the fid=xxxx appended to the URLs.
- Input Form (profile.asp) - a hyperlink to collect contact data.
- Modify/Unsubscribe Form (default.asp) - given to users so they can subscribe, unsubscribe, or modify their record.
Create a Form
You can create a new Form and set it up using the steps that are detailed above.
- Below the list of Forms, click the Add Input Form button.
- On the Add Input Form page:
- Specify a unique name for the Form.
- Accept the default Form Branding option or click the dropdown to select one (if any custom Brandings have been created).
- Refer to the information above to work through the remaining settings.
- Click Update.
- Review the list of Forms and make sure your new Form is listed.