This article...
- Explains that the Recency and Frequency Rules act individually and in tandem to regulate email volume.
- Describes how to create each of these rules in the Admin interface.
- Outlines steps for applying rules to messages using Mailing Designer 1 or QuickMail.
- Describes the list- and rule-management actions (e.g., search, export, delete).
Feature overview
Individually, Recency rules and Frequency rules give you a mechanism by which you can automatically limit the number of messages that your organization sends to contacts. The rules are independent of one another, but can be used together to better manage your message-send volume.
Feature availability
The Recency rules and Frequency rules are features are available only for Mailing Designer 1 and QuickMail messages. These features are not available in Message Designer.
Feature benefits
Use these rules when sending Mailing Designer 1 and QuickMail messages to ensure that:
- Your "send" volume is not so much that it overwhelms your contacts.
- Your deliverability and send reputations are not negatively impacted by a high send volume and the complaints that could result.
Recency rules
TIP: Recency Rule functionality is based on a set number of days; whereas Frequency Rule functionality is based on a set number of messages per month. These rules can be used either independently or together for maximum affect and message-send management.
Recency Rules:
- can be managed (edited, deleted) in the Admin interface, and you can export the list of Recency Rules.
- limit the number of messages that can be sent to a contact by setting the minimum number of days that must pass between message sends.
- are based on a calendar day (Monday, Tuesday), not a 24-hour period.
EXAMPLE: Recency Rule is set to 1 Day and you send a message on Monday at 11:00 am. The rule prevents any additional messages being sent on Monday, but a message can be sent at 9:00 am on Tuesday. This restriction repeats each day until/unless the Recency Rule is removed.
To create one or more Recency rules:
- Access the Admin interface.
- Navigate to Messages > Options > Recency & Frequency Rules and click the Recency Rules tab.
- Click CREATE RECENCY.
- In the popup:
-
- Click the dropdown to select a number (1 – 30) as the minimum number of days that must pass between messages.
- Click Save to add the rule.
The rule now:
- displays in the list in its numerical position,
- can be managed right from the list, and
- can be applied to mailings.
Frequency rules
TIP: Frequency Rule functionality is based on a set number of messages per month; whereas Recency Rule functionality is based on a set number of days. These rules can be used either independently or together for maximum affect and message-send management.
Frequency Rules:
- can be managed (edited, deleted) in the Admin interface, and you can export the list of Frequency Rules.
- limit the number of messages that can be sent to a contact within a month by setting the maximum number of messages (a messages-per-month threshold).
- are based on a calendar month (May, June), not a 30-day period.
EXAMPLE: Frequency Rule is set to 10 Emails and you send 10 messages during the first two weeks of May. The rule prevents any additional messages being sent in May. You start June with a fresh 10-message monthly limit. This restriction repeats each month until/unless the Frequency Rule is removed.
- Access the Admin interface.
- Navigate to Messages > Options > Recency & Frequency Rules and click the Frequency Rules tab.
- Click CREATE FREQ.
- In the popup:
-
- Click the dropdown to select a number (1 – 30) as the maximum number of messages that can be sent over the course of the month.
- Click Save to add the rule.
The rule now:
- displays in the list in its numerical position,
- can be managed right from the list, and
- can be applied to mailings.
Insert a rule in a message
Recency and Frequency Rules can be added to your messages and they are available on the same dialog, as shown below.
While editing a message in Mailing Designer 1:
- Click the Set-Up tab.
- Click to expand the Advanced options.
- Click the Do not send to field.
- In the dialog, use the checkboxes to enable the Frequency and/or Recency rules, and click the dropdown to select a rule.
- Click Update to apply your settings and to close the dialog.
- Save the message.
NOTE: While editing a QuickMail, you can apply a rule in a similar manner using the associated menus, as shown below.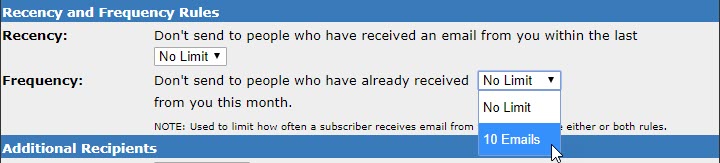
Management actions
For the recency and the frequency rules, you can perform several management actions using the buttons above the list:
- Click Search to display a dialog where you can search for a rule. Click [+] to add a search criterion, and configure it with the available filters. You can click [+] to add multiple criterion, if needed. Click the Find button to initiate the search.
- If you've performed a search, click Reset to restore the original list.
- Click Export to export the current list to an Excel file. This is a great way to share data with others in your organization. Keep in mind that exporting respects any search filters you have set, so if you want to export only specific rules, be sure to perform a search first.
- Click Show Deleted to display any rules that have been deleted (they're shown in red). If you want to restore a deleted rule, hover on its menu icon and select Undelete.
- Select one or more items by checking the boxes to their left, and then click Delete, followed by OK in the confirmation pop-up, to remove it.
Manage a rule
To the left of each recency and frequency rule is a menu icon. Hover on this icon to access the options.
- Click Edit to change its details.
- Click Delete, followed by OK in the confirmation pop-up, to remove the rule.
NOTE: Click the Show Deleted button above the list to display any rules that have been deleted (they're shown in red). If you want to restore a deleted item, hover on its menu icon and select Undelete.