Before you begin
- Review the netFORUM Pro Integration Overview to answer general questions about the integration - more detailed information can be found in the integration articles.
- The netFORUM integration with Higher Logic Thrive Marketing Professional (Thrive Marketing Professional) will require its own xWeb License - even if you already have one with the community platform.
- Ensure that your Thrive Marketing Professional is licensed for an integration - you can do this by confirming with your Implementation Project Manager or creating a case via support.higherlogic.com.
Getting Started
Configuring netFORUM Pro
- Create a case with Abila Support
- SUBJECT: Informz integration with netFORUM Pro - [Client Name]
- SUPPORT PRODUCT: netFORUM Pro
- SUPPORT PRODUCT TYPE: Integration
- PRODUCT APPLICATION: eMail
- PRIORITY: Severity Level 4
- CASE DESCRIPTION:
- Please set up the Informz integration for [Client Name].
- Here is the Informz URL that should be used for the system option: [Client's Informz Login URL (ex: https://xxx.informz.net/....)]
- Please complete the following:
- Set Informz as the email provider in system settings in NetFORUM Pro
- Create a user login and password for Informz in NetFORUM Pro and share this with Informz
- Add the Informz brand URL to the NetFORUM Pro entity in system settings
- Create a sample messaging job that will be used to test the Informz sync and write-back functionality
Abila Support will:
- Set Informz as the email provider in system settings in NetFORUM Pro
- Create the xWeb login and password for the integration
- Add the Informz brand URL in system settings in NetFORUM Pro
- Create a sample messaging job that will appear in Informz as a target group (the target group type will be "Individual")
- Update the support case to provide the xWeb credentials
Activate the Integration
- Log into Thrive Marketing Professional with an account that has Administrator privileges.
- Navigate to Admin > System Settings.
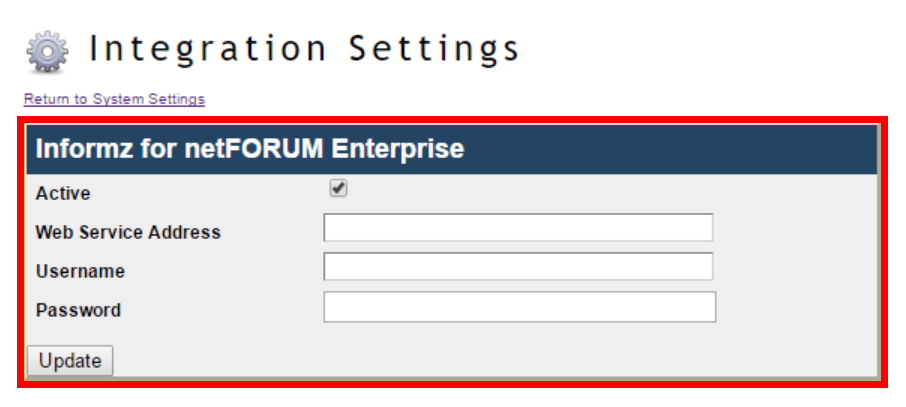
- Scroll down to the Integration Settings area and click Edit Integration Settings.

- On the resulting page, check the Active box.

- Populate the fields with the information provided by Abila
- Active: Mark the checkbox
- Web Service Address: https://netforum.avectra.com/xweb/mailinglist.asmx
- Username: [provided by Abila Support]
- Password: [provided by Abila Support]
- Click "Update"
Configure Opt-Out URL
- In Thrive Marketing Professional, navigate to Admin -> System Settings -> "Opt-Out Management"
- Page URL: https://netforum.avectra.com/public/EmailUnsubscribe.aspx (same for all netFORUM Pro clients)

Post-Configuration Steps
Once the integration is completed:
- Review the integration documentation and learning materials
- Refresh a distribution target group
- Enable Writebacks
Advanced Testing
Syncing - Target Group List Sync
- In Thrive Marketing Professional, navigate to Subscribers -> Target Groups
- Select the "Individual" target group folder
- Click on "Refresh Target Group List"
- Confirm that the sample distribution list that Abila Support created is visible in the Target Group List
Syncing - Individual Target Group Sync
- Hover over the sample distribution list and click "Info"
- Click on "sync"
- Confirm that the sync successfully displays the record in the sample distribution list
Personalization - View List of Personalization Attributes
- In Thrive Marketing Professional, navigate to Admin -> Setup -> Bridge Configuration
- Under Personalization Attributes, click List of Personalization Attributes
- Confirm that the personalization attributes are available under the various target group types (e.g. Certificant, Customer, Individual, Member)
Unsubscribe - Confirm Write-Back
- In Thrive Marketing Professional, navigate to Subscribers -> Target Groups
- Find the sample target group that Abila created, and drill down to view the subscriber record in the target group
- Unsubscribe the subscriber
- Navigate to Admin -> Setup -> Bridge Configuration
- Under Writebacks, click Writeback List
- Confirm that the unsubscribe write-back has a status of "Sent" (write-back may take a few minutes to be sent; periodically refresh the page until status is updated)
- Once the write-back has a status of "Sent," update the Abila Support Case requesting for Abila to confirm that the test record has been updated with the unsubscribe write-back
- Abila confirms that the record was successfully updated with the unsubscribe
Resubscribe - Confirm Write-Back
- In Thrive Marketing Professional, navigate to Subscribers -> Search
- Search for the test record that was previously unsubscribed
- Resubscribe the subscriber
- Navigate to Admin -> Setup -> Bridge Configuration
- Under Writebacks, click Writeback List
- Confirm that the resubscribe write-back has a status of "Sent" (write-back may take a few minutes to be sent; periodically refresh the page until status is updated)
- Once the write-back has a status of "Sent," update the Abila Support Case requesting for Abila to confirm that the test record has been updated with the resubscribe write-back
- Abila confirms that the record was successfully updated with the resubscribe