You can create and save your embedded and external recorded sessions and then effectively "hide" them so that registrants cannot view them until you make them available. This is beneficial if you want to ensure that your recorded sessions are consumed in a designated order (for example, session A imparts information that is necessary to have in order to fully understand session B).
The ability to control when your recorded sessions are available allows you to manage the flow of your virtual event as though it was an in-person conference with sessions occurring at scheduled times -- and the content of those sessions being unavailable until the scheduled time.
This "release scheduling" can be done using Event Engagement's Moderation feature. Moderation is designed to keep content (such as Discussion posts and Library uploads) unavailable until it has been reviewed and approved by an Admin. However, this functionality can be adapted so that the Moderation feature acts as an ON/OFF (i.e., SHOW/HIDE) toggle for your recorded sessions. With it, you (as a Super Admin) choose when to make recorded sessions available to your registrants.
Understanding moderation
To understand how you can use Event Engagement's moderation settings to control the availability of your recorded sessions, review the distinctions.
NOTE: Moderation settings are not back-fitted to existing recorded sessions in the track. The settings apply only to sessions that are created after the setting is applied.
- Full Moderation - Any recorded sessions that are created for the track after this setting is applied will be automatically placed in the track's moderation queue. These moderated recorded sessions must then be approved by a Super Admin in order to be available to your registrants. This ensures that all new sessions are "hidden" until you want them visible.
- Self Moderation - All recorded sessions created for the track after this setting is applied do not require Super Admin approval; they are immediately available in the track. However, this setting surfaces a Mark as Inappropriate button on session home pages which you can click to individually place recorded sessions in the track's moderation queue. When you want to make moderated sessions available to your registrants, a Super Admin can approve them.
Use moderation to show/hide your sessions
Moderation can be applied to a track to simplify managing the availability of its recorded sessions. Each recorded session can be manually managed, too, if necessary. This section presents best practices for managing:
- an empty track (to which you'll add recorded sessions) and
- a track that already has recorded sessions that you want to manage.
Tracks with no recorded sessions
If your track currently has no recorded sessions, you can set it to Full Moderation so that all recorded sessions that get created will be automatically added to the track's moderation queue (i.e., hidden) until you want them to be available.
To apply Full Moderation to a track:
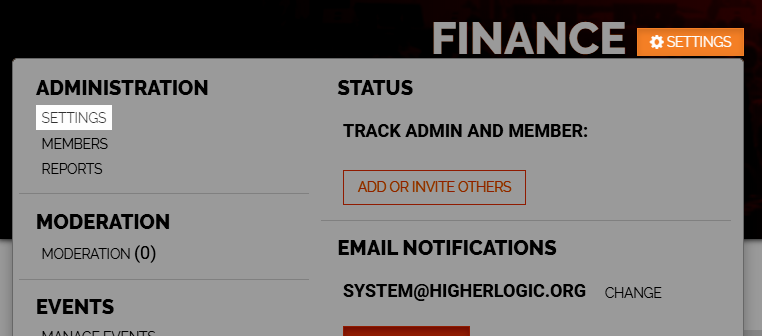
- Navigate to the track's home page and in the banner click SETTINGS.
- Click SETTINGS under ADMINISTRATION.
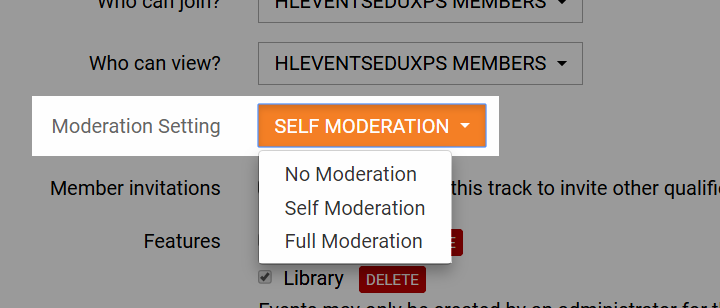
- Select Full Moderation from the Moderation Setting dropdown.
- Click Save.
The track is now in Full Moderation, meaning any recorded sessions created for that track moving forward will automatically be placed in its moderation queue. These moderated sessions must then be approved by a Super Admin before being made public.
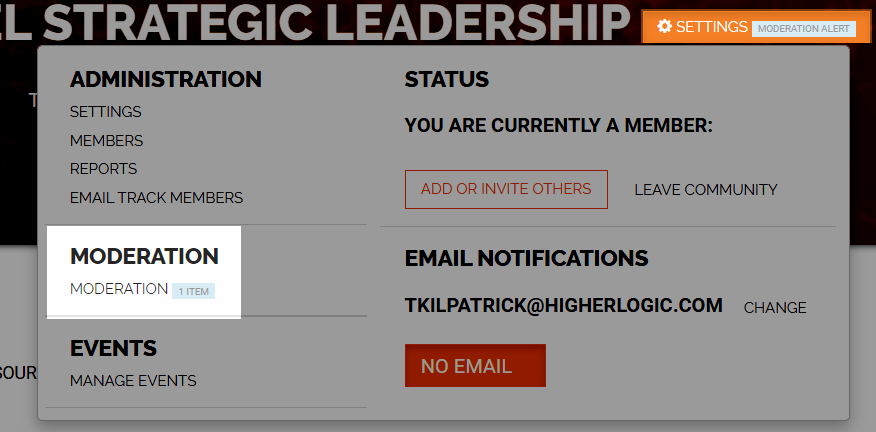
NOTE: The track's Settings menu displays Moderation Alert when new items are in the moderation queue and the Moderation option displays the number of items.
To remove a track from Full Moderation:
- Navigate to the track's home page and in the banner click SETTINGS.
- Click SETTINGS under ADMINISTRATION.

- Select Self Moderation from the Moderation Setting dropdown.

- Click Save.
NOTE: By selecting Self Moderation instead of No Moderation, you enable the Mark as Inappropriate option so that you can manage individual recorded sessions within the track.
The next section details how to manage the visibility of individual recorded sessions.
Tracks with recorded sessions
If your track currently has embedded and/or external recorded sessions that are available and you want to hide them, you can set the track to Self Moderation and place the recorded sessions in the moderation queue by manually marking them as "inappropriate."
NOTE: By selecting Self Moderation, you enable the Mark as Inappropriate option so that you can manage individual recorded sessions within the track.
To set a track to Self Moderation:
- Navigate to the track's home page and in the banner click SETTINGS.
- Click SETTINGS under ADMINISTRATION.

- Select Self Moderation from the Moderation Setting dropdown.

- Click Save.
To place an existing recorded session in the moderation queue:
- Navigate to the session's home page.
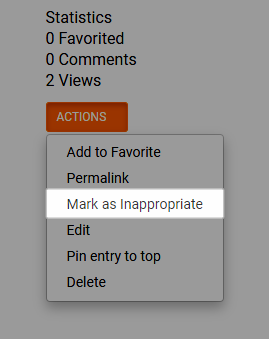
- Click the ACTIONS down arrow and select Mark as Inappropriate.
- In the Reason for Moderation dialog, just indicate that you're temporarily hiding it and click SUBMIT.
A message appears in the banner confirming that the recorded session is now in moderation and the In Moderation message displays in a blue field under the session title.
NOTE: Recorded sessions that are in the moderation queue will not be visible on the track's session-list page to registrants, but will display for Super Admins, marked as In Moderation.
In Event Engagement there are a few ways to remove a recorded session from the moderation queue, but the recommended method is to use the Approve option on the Moderation Queue page, as described in the next section.
Approve multiple recorded sessions
In addition to managing recorded session visibility through moderation at the track level, you can easily manage multiple recorded sessions in multiple tracks. This is useful if you have tracks (with recorded sessions) that focus on different topics and which are targeted to different registrants, but which you want to make available (i.e., "approve") at the same time.
Instead of navigating to multiple tracks to manually approve their recorded sessions, you can simply use the site-wide Moderation Queue.
NOTE: While this page doesn't have a multi-select feature, you can quickly approve multiple recorded sessions without having to visit multiple tracks.
- Click the gear icon (on the right side of your page, by default) to access the Admin interface.
- Navigate to Community > Moderation > Queue. The Items Pending page displays all site content (including recorded sessions) that is currently in moderation.

- Select a recorded session and click Approve.
- On the confirmation dialog, click Approve.
- After the page refreshes, approve each recorded session that you want to make available.
TIP: As time permits, check the tracks' session-list pages and verify that the recorded sessions are not marked as In Moderation.
Create a session Watch Guide for a track
Because the Conference Schedule page only lists your upcoming live sessions, let’s look at how to create a “schedule” to showcase your recorded sessions for each track.
You can create a PDF or Word guide for a track that clearly outlines how your registrants are to watch/consume its recorded sessions.
EXAMPLE: Let's say you have four recorded sessions that you want your registrants to "watch" in a specific order on Monday, April 27th. Consider naming them like this:
- Session 1: Title of Recorded Session | [Monday, April 27th]
- Session 2: Title of Recorded Session | [Monday, April 27th]
- Session 3: Title of Recorded Session | [Monday, April 27th]
- Session 4: Title of Recorded Session | [Monday, April 27th]
Step 1 - Upload the Watch Guide
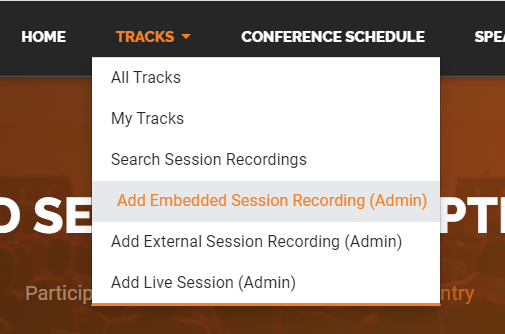
Create a new session using the Add Embedded Session Recording option, available in the Tracks menu. While this is the method to upload embedded recorded sessions, you can use it to also upload other resources. So, go through the upload process but upload your Word or PDF document, rather than a recorded session.
Step 2 - Feature the Watch Guide on a track Home page
You can make that recorded session Watch Guide always appear on a track's Home page by flagging it as a Featured Session; this will ensure your registrants will see it.
See How to Feature a Session on a Track Home Page to learn how to do so.
TIP: For additional exposure, you can link to your Watch Guide in the track's Discussions area, and even share it in your conference materials/communications.