Super Admins can limit access to their recorded sessions when necessary. For example, you might have a session for which registrants have to pay an extra fee or a session that's targeted at executive-level registrants. In both instances, you want to be sure that access to it is restricted to those targeted registrants.
You can use Event Engagement's Invitation Only option to ensure that a recorded session is available to your targeted registrants only. Even though this option helps you limit access to a session, it is configured and applied at the track level only. So you have to create an invitation-only track and then add the recorded session.
NOTE: You have to create one track for each invitation-only recorded session.
Create an invitation-only Track
Start by following the steps to create a track as described in Create & Edit Tracks. On the Create New Track page do the following.
To configure an invitation-only track:
- If the track will be visible (i.e., Who can view? is set to Members, Authenticated, or Public), in the Description field, indicate things like attendance is by invitation-only, whether an additional fee applies, and attendance is restricted to a specific group of registrants.
- Click the Who can join? dropdown and select Invitation Only. (Only invited registrants will be able to join the track, making them members; its listing on the All Tracks page will not have a JOIN button.)
- Click the Who can view? dropdown and select:

- Invitation Only - The track will be visible on the All Tracks page for invited registrants only.
- Members - The track will be visible on the All Tracks page for invited registrants and logged-in members only.
- Authenticated - The track will be visible on the All Tracks page for all logged-in registrants.
- Public - The track will be visible on the All Tracks page for all visitors to your site (logged in or not).
- Optionally, check the Member invitations box. (This will allow track members to invite others to join.)
- Click either:
- Save to create the track and invite registrants later via the track's SETTINGS. Refer to Manage Track membership, below.
- Save and Invite Members to create the track and start inviting registrants. Continue with the next section.
Create and send an invitation
With the invitation-only track now set up, you should compose an invitation message and send it to your targeted registrants. When they accept the invitation, they become "members" of the track.
To create and send an invitation:
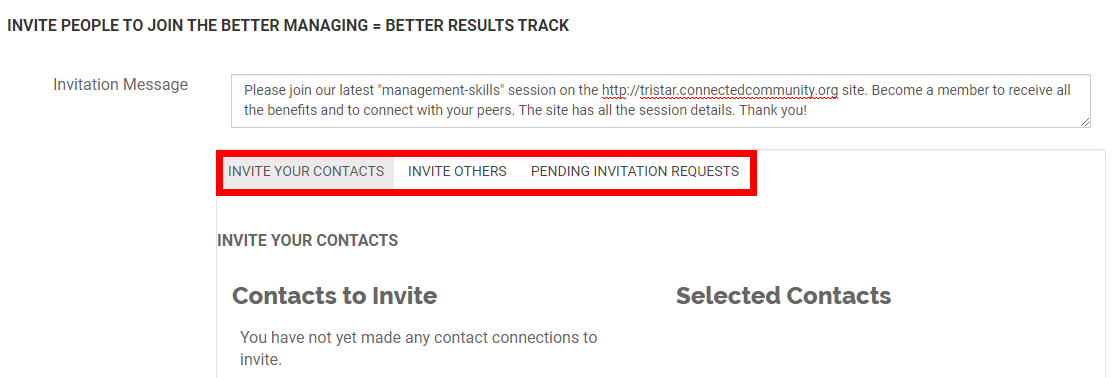
- Compose your message in the Invitation Message field.
IMPORTANT: Your invitation-message text is not saved when you leave this page. If you'll be sending additional invitations and want to use the same text/information, you should copy the text and save it in a text or document file.
- Use the tabs to select and invite contacts.

NOTE: You can work back and forth across these tabs; the page will not close until you click FINISHED.
Refer to the descriptions in the table below to learn more about the invitation-page tabs.
| INVITE YOUR CONTACTS | Select individual contacts or click CHECK ALL. Contacts will be automatically added to the Selected Contacts list. When you've finished selecting contacts, click SEND INVITATION. The page refreshes and indicates that the invitations have been sent. Click the PENDING INVITATION REQUESTS tab to confirm the send. |
| INVITE OTHERS | Type in any of the fields and click SEARCH; the results display below. Check the box next to the contacts that you want to invite and click ADD SELECTED TO INVITE LIST. The page refreshes and the selected contacts display in a table with check boxes. The Status column indicates whether: the contact is already a member and has already been invited.
NOTE: The INVITE and ADD IMMEDIATELY buttons are "activated" but they have no effect until at least one contact check box is checked. |
| PENDING INVITATION REQUESTS | Displays the invitations that you've sent and the send date. To resend the invitation to a contact, check the box next to their name and click RESEND INVITATION. |
NOTE: As contacts accept the invitation, they are added to the Attendees list on the track's home page.
TIP: You can return to the invitation page to send invitations to additional contacts. Also, the Pending tab is an easy way to quickly see which contacts have not yet accepted.
- Click FINISHED.
Add a recorded session
Now that the track is created and the invitation configured, you have to add an embedded or external recorded session. See the following articles to learn how to add your recorded sessions.
NOTE: Remember, each invitation-only track can host only one recorded session.
NOTE: The recorded sessions that you add to an invitation-only track will be visible to only those members that you add and those invitees who accept.
Your invitation-only track and its recorded session are now ready.
- You can send additional invitations and add more members to your invitation-only track as described in the sections that follow.
- You can also "hide" this track or the recorded session until you're ready for it to be viewed. See Show & Hide Your Recorded Sessions.
Manage Track membership
You can manage the track's members by sending additional invitations and adding more members using the options on the invitation page.
To access the invitation page:
- On the track's home page, click SETTINGS (next to the track title).
- Click ADD OR INVITE OTHERS under STATUS to access the Invitation page.

Refer to Send invitations, above. Use the INVITE OTHERS tab to send multiple invitations and to add several members to the track.
TIP: Whenever you add a registrant as a member to the track, the registrant won't know that they've been added; you should inform them.
Manually add members
You can manually add registrants to an invitation-only track (without having to send an invitation) to make them members of the track.
NOTE: You can send an invitation email message in this process, too, but our focus is the add-immediately option.
To manually add a member to a track:
- On the track's home page, click SETTINGS (next to the track title).
- Click MEMBERS under ADMINISTRATION to access the Manage Community Members page.

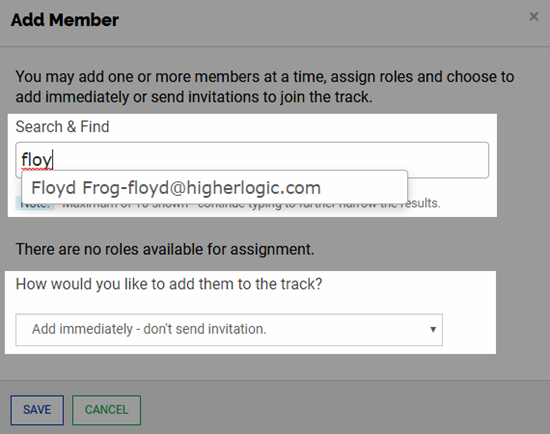
- Click the ADD MEMBER button above the list on the right to open the Add Member dialog.

- Type at least three letters of the registrant's name or email address in the Search & Find field to trigger the search and display the results. (Type more letters to refine long lists of names.)
- Click a registrant's name to add them. (Repeat this process to add more registrants.)
- Select Add immediately - don't send invitation from the dropdown.
- Click Save.
The registrants are instantly added to the list as members of the track.
NOTE: Because the add-immediately option was selected, the registrant won't know that they've been added to the track; you should inform them.